GenTest setup affects the full UTM testing workflow: method storage, PC-to-controller communication, user permissions, simulation files, live data acquisition, and report output.
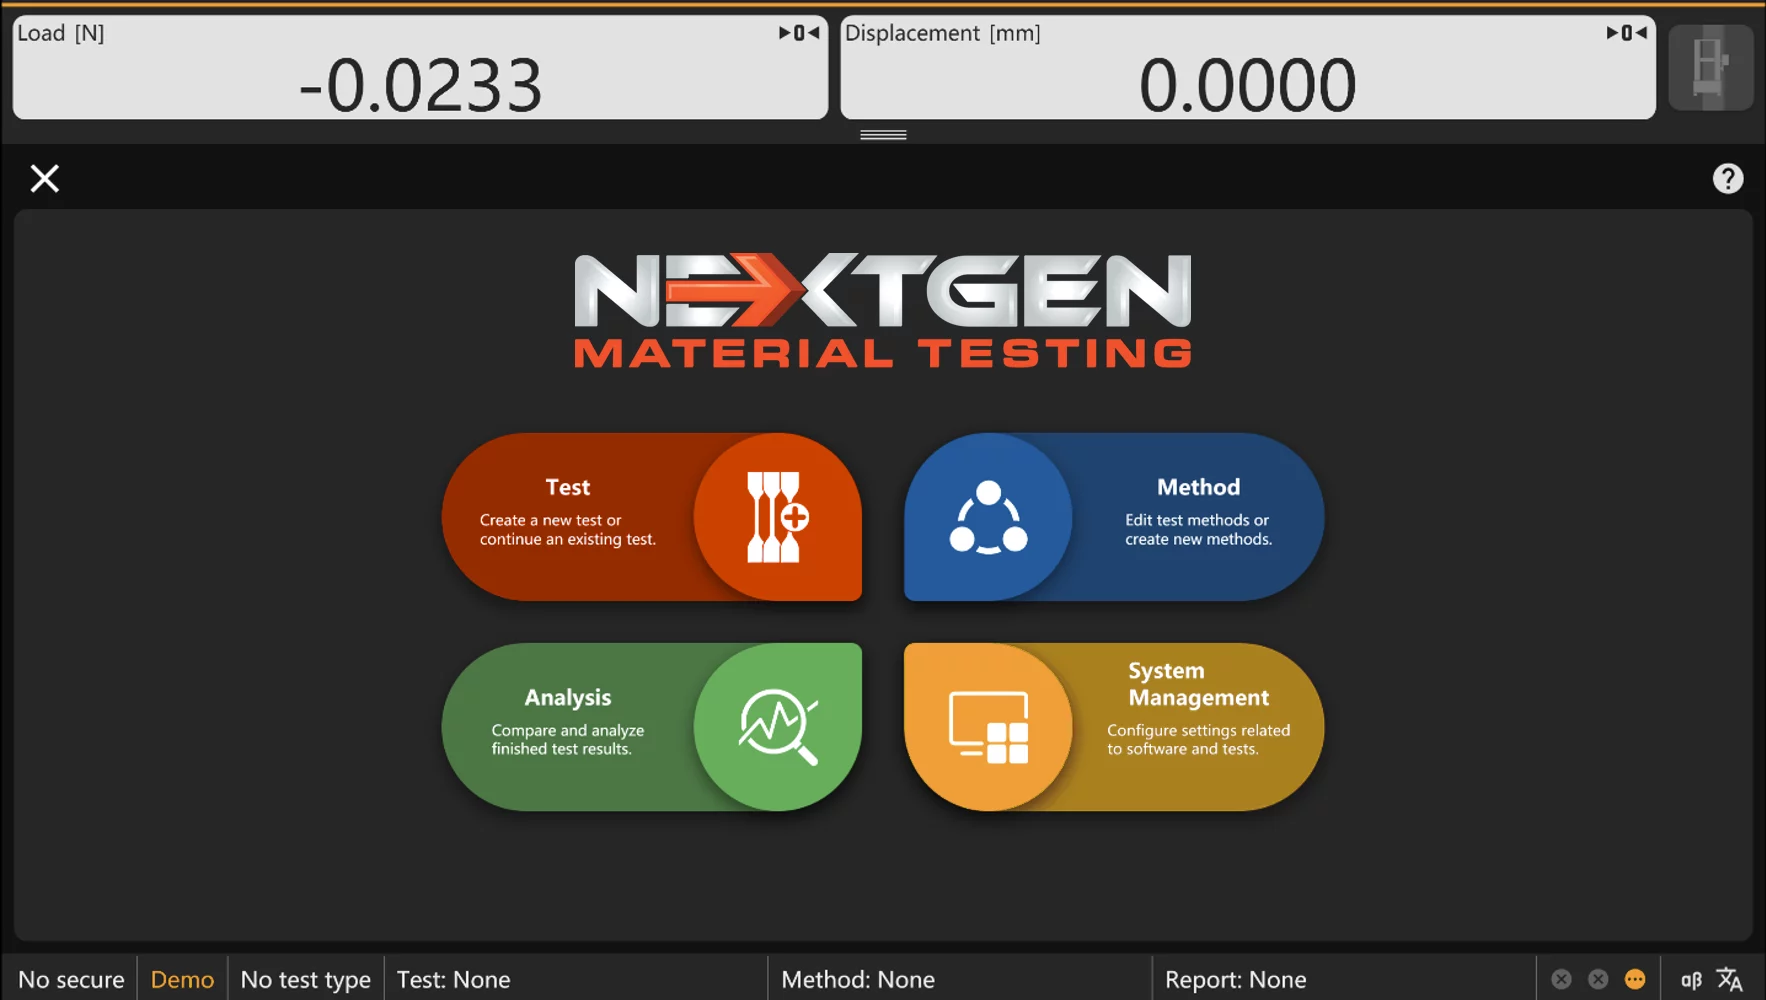
This guide follows the GenTest setup video step by step for NextGen NG-EML electromechanical universal testing machines. It covers installation, license activation, workspace configuration, UTM controller connection, safety and peripheral setup, user management, DEMO Mode, simulation files, Control Panel setup, Quick Test, and test method creation.
GenTest is the software layer where the test method, machine connection, operator input, live data, calculated results, and report output come together. For operators, service teams, QA/QC labs, and R&D users, the goal is to set up the software in a way that supports repeatable testing, clear method control, organized data storage, and traceable reporting.
Watch the GenTest Setup Video
Watch the video first for the screen-by-screen setup flow, then use the sections below to review each step in more detail. The written guide adds context for lab setup, controller communication, user permissions, method control, simulation workflows, and reporting.
The chapters below can also be used as quick navigation if you need to jump directly to installation, licensing, Ethernet setup, DEMO Mode, method creation, or test execution.
Video Chapters
- 00:00 – GenTest Software Setup Overview
- 00:29 – Installing the GenTest Software
- 00:46 – GenTest License Activation
- 01:32 – Setting the Workspace Path
- 01:55 – Connecting the UTM Controller via Ethernet
- 02:20 – Configuring the Safety Shield
- 02:45 – LED Strip Setup and USB Driver Installation
- 03:20 – User Management and Access Rights
- 04:36 – Running GenTest in Demo Mode
- 04:59 – Creating a Demo Test Method
- 05:44 – Generating a Test Simulation File
- 06:19 – Control Panel Setup
- 07:02 – Running a Quick Test
- 07:21 – Creating a New Method from a Normal Template
- 08:01 – Creating a Method from an Expert Template
- 08:44 – Creating a Method from an Example Method
- 09:12 – Running a Test from History Methods
- 09:44 – Running a Test from History Tests
GenTest Setup Video Walkthrough
The walkthrough below follows the same order as the video. Each timestamp explains the setup action, the reason it matters in a UTM workflow, and the practical checks that should be confirmed before live testing.
00:00 – GenTest Software Setup Overview
At 00:00, the walkthrough starts with the full GenTest setup scope. The setup covers the main software installation and points to related configuration areas, including Temperature Controller setup for furnace or climatic chamber control and DTC500 configuration for hardware setup, calibration, and PID tuning.
The opening section frames GenTest setup as a complete workflow, not a single installation step. The software has to be installed, licensed, connected to the controller, configured for users and peripherals, and prepared for method-based test execution.
The later sections move through that workflow in order: licensing, workspace selection, controller communication, safety and peripheral configuration, user permissions, DEMO Mode, simulation files, method setup, and test execution.
Start by confirming the system configuration: standard UTM software, UTM with temperature control, UTM with furnace or climatic chamber control, or a setup that includes DTC500 hardware. The configuration determines which setup steps are required for the lab, service team, or QA/QC workflow.

00:29 – Installing the GenTest Software
At 00:29, the setup moves to the GenTest installer. Open the setup file, start the installation, select the preferred language, and complete the initial software setup.
This prepares the lab PC for the rest of the GenTest workflow. The software should be installed before license activation, workspace configuration, UTM controller connection, user setup, safety device configuration, and method creation. At this point, GenTest may open on the computer, but the UTM workflow is not ready for live testing yet.
For a clean installation, use the lab PC assigned to the UTM and run the installer with the required permissions. Keep the GenTest installer, license information, machine model, controller details, and required drivers available during setup. If the system includes USB or serial peripherals, such as an LED strip or additional controller hardware, those drivers may need to be installed and verified later.
After installation, open GenTest once to confirm that the software launches correctly. The following setup steps define how the software is licensed, where test data is stored, how the PC communicates with the UTM, and which users can access system functions.
00:46 – GenTest License Activation
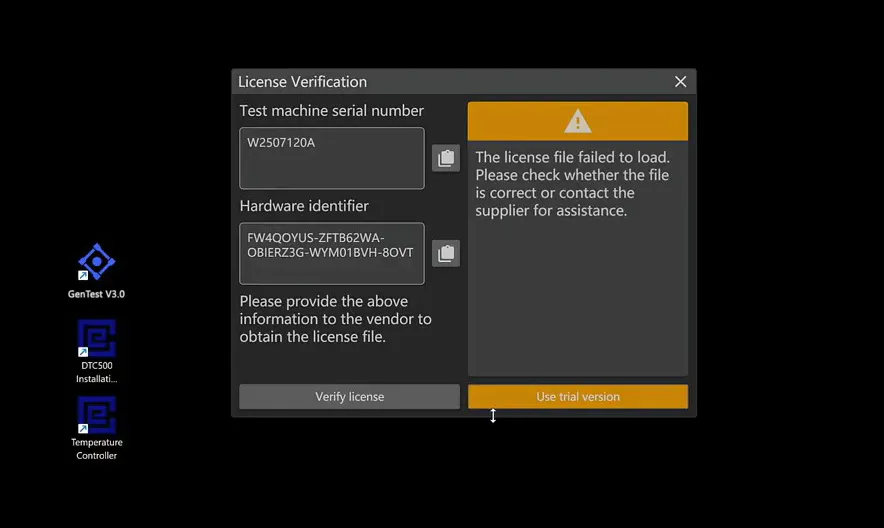
At 00:46, the video moves to GenTest license activation. The software displays a serial number and hardware ID. Copy both values and send them to NextGen so the correct license can be issued for that installation.
If the software needs to run before permanent activation, select Trial Version. When the license is available, select Update License to apply it, then select Verify License to confirm that activation was accepted.
The serial number and hardware ID identify the software installation, so both values need to be copied accurately. If the wrong values are submitted, the license may not match the PC or software installation that needs to be activated.
Confirm the license status before continuing with final lab setup. If activation does not work, check that the license file or key matches the current serial number and hardware ID. For support, send NextGen the serial number, hardware ID, machine model, controller information, and software version.
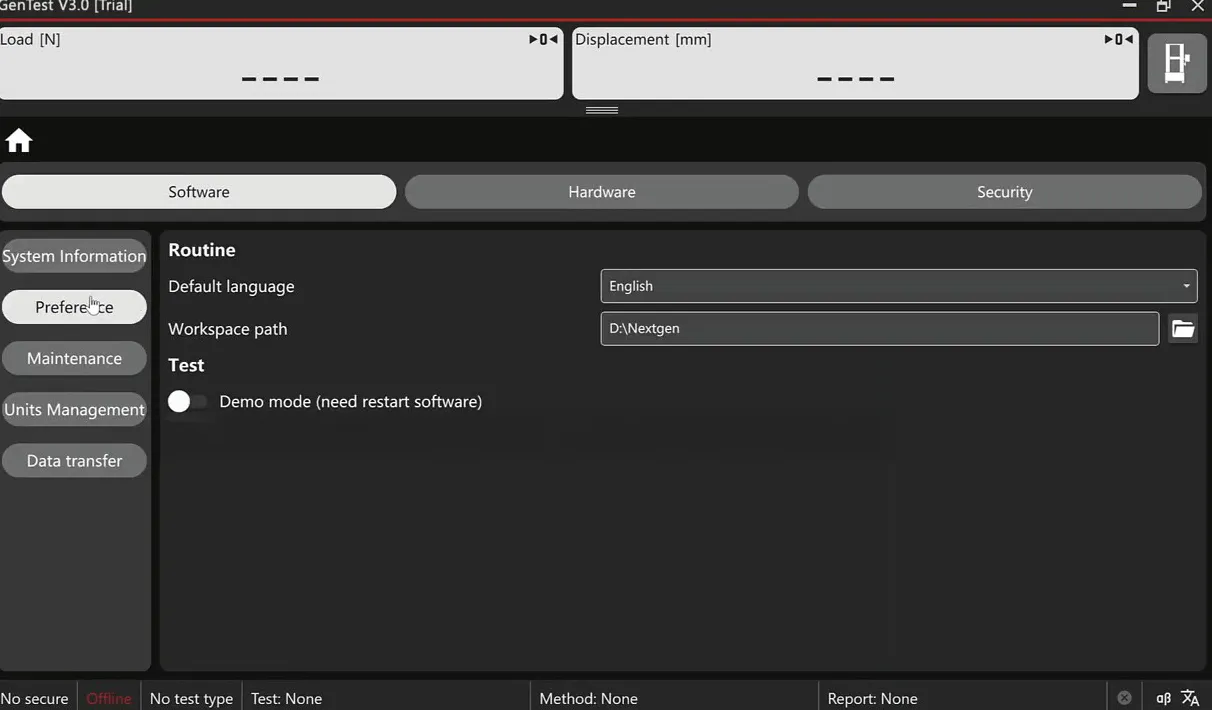
01:32 – Setting the Workspace Path
At 01:32, the setup moves to the GenTest workspace path. This setting defines where GenTest stores test files, methods, report templates, simulation files, and historical data.
The workspace should be selected before real testing begins. In a lab environment, this is not just a folder preference. It affects how operators find approved methods, how previous test records are stored, and how report templates stay connected to the correct testing workflow. If the workspace is placed in a temporary folder or on a personal desktop, records can become difficult to manage later, especially when several operators, machines, or projects are involved.
A better approach is to use a controlled location that matches the lab’s data policy. For some labs, that may be a managed local drive. For others, it may be an approved network location with backup access. The key requirement is simple: users who run tests need the right read/write permissions, and the folder structure should make methods, templates, and historical records easy to locate.
GenTest organizes test data around projects, methods, and sample identifiers. A test record may include the sample ID, batch number, operator, date, method, and machine information, so the workspace should support traceability from the start. Set this path before creating methods or running tests to keep the software environment clean and consistent.
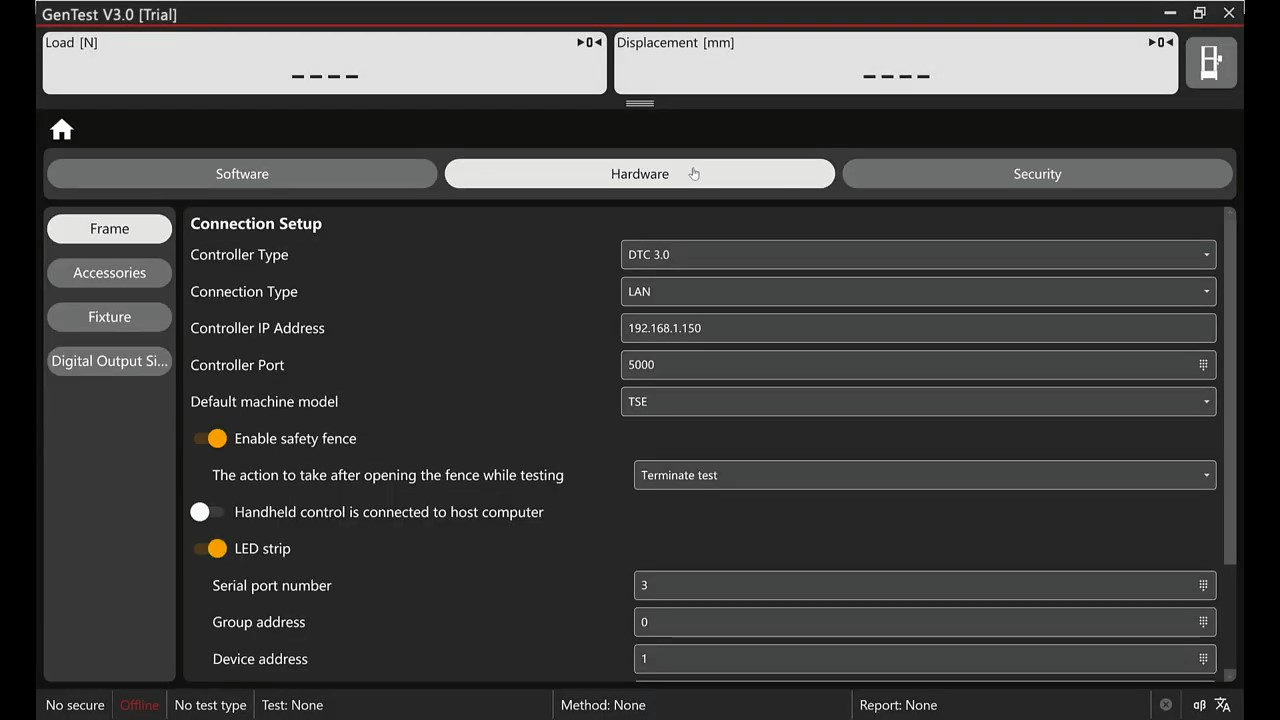
01:55 – Connecting the UTM Controller via Ethernet
At 01:55, the setup moves from software storage to machine communication. GenTest connects the PC to the universal testing machine controller through Ethernet. In the video, the default controller IP address is shown as 192.168.1.150, and the computer must be set within the same network range.
This connection is required for GenTest to communicate with the machine controller during operation. Without a stable Ethernet connection, the software may not detect the UTM, receive machine status, or collect real-time force, displacement, and strain data. The cable can be connected physically, but communication will still fail if the PC and controller are not on the same IP range.
Use the correct Ethernet adapter and confirm that the controller is powered. If the machine is not detected, check the physical cable first, then review the PC adapter settings, IP address, subnet settings, firewall rules, and controller status. A dedicated wired connection is usually the right choice for machine communication; Wi-Fi should not be used unless the system configuration specifically supports it.
Exact adapter settings, subnet mask, communication test screens, and controller troubleshooting should follow the official setup or service instructions for the machine. Ethernet setup is the step that moves GenTest from offline software configuration into live machine communication and data acquisition.

02:20 – Configuring the Safety Shield
At 02:20, the setup moves to safety shield configuration. This step should be completed before operating the universal testing machine, because the safety shield is part of the machine’s safety setup.
The purpose is to confirm that the required safety-related hardware is connected, configured, and recognized by the system. GenTest should not be treated as ready for live machine operation until the safety shield setup is complete for the specific machine configuration.
For operators, the practical check is simple: confirm the safety shield is physically connected and that the software recognizes the correct safety state. Do not run operational tests until this is confirmed.
Exact wiring, open/closed status, software indicators, error behavior, and safety logic should always follow the official manual or service documentation for the machine configuration. This setup step confirms the safety shield’s role in the GenTest workflow, but machine-specific safety instructions remain the source of truth.

02:45 – LED Strip Setup and USB Driver Installation
At 02:45, the setup moves to the LED strip connection. The LED strip connects to the PC through a serial-to-USB cable, so Windows must recognize the device before GenTest can communicate with it correctly.
Install the USB driver included with the main unit, connect the USB cable to the computer, attach the other end to the LED strip, then open Device Manager and verify the assigned port number.
The important detail is the COM port. The port number shown in Device Manager must match the port selected in the software. If the port numbers do not match, the LED strip may be physically connected but still unavailable inside GenTest.
If the device is not detected, start with the basic checks: driver installation, USB cable, USB port, Windows device status, and COM port assignment. For the exact driver name, LED behavior, and troubleshooting steps, follow the official hardware documentation for the system.

03:20 – User Management and Access Rights
At 03:20, the video moves into user management. This is where accounts can be added, edited, or removed, and where access rights are assigned according to the user’s role in the lab.
In GenTest, user management is part of lab control and data integrity. Operators, supervisors, and administrators should not always have the same access level. A routine operator may only need access to approved methods, test execution, result viewing, and report generation. A supervisor or lab manager may need permission to manage methods, review results, and approve changes. An administrator may control users, security settings, and system configuration.
The video also shows that after a username and password are created, the user can log out and log back in with the new account. Under the Security tab, additional users can be added as needed and assigned administrative rights based on operational requirements.
This supports traceability. Separate logins make it easier to record who ran a test, when it was performed, and which method was used. They also reduce the risk of accidental changes to calibration data, standard methods, or system settings. For labs running routine QC, supplier approval, or R&D testing, user permissions should be configured before the software becomes part of daily operation.
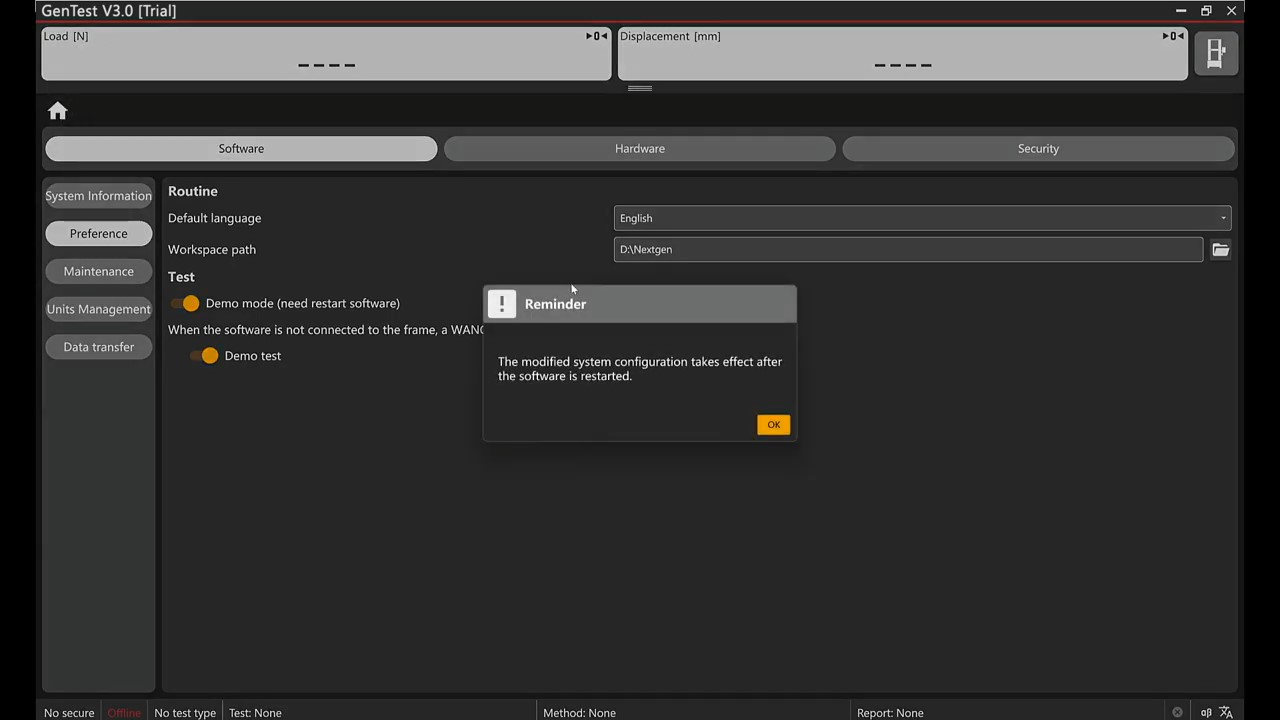
04:36 – Running GenTest in Demo Mode
At 04:36, the walkthrough switches from setup configuration to DEMO Mode. In Preferences > Software, the user enables DEMO Mode, returns to the home screen, and restarts the program so GenTest can run simulated tests without connecting to the machine.
This mode is useful when the lab needs to train operators, demonstrate the software workflow, or review method behavior before using the UTM for a live specimen. It gives users a way to practice the screen sequence, method selection, test run process, and reporting flow without moving the crosshead or collecting live machine data.
For a new installation, DEMO Mode can also help service teams and lab managers confirm that the software workflow is understood before machine communication and live testing are introduced. It is especially useful when training new operators or preparing a customer demonstration.
Use DEMO Mode as a training and simulation tool only. It does not replace machine verification, calibration, safety checks, or validation with real specimens. Once the lab is ready for live testing, confirm that the software is no longer operating in simulation mode unless a simulated run is intentional.
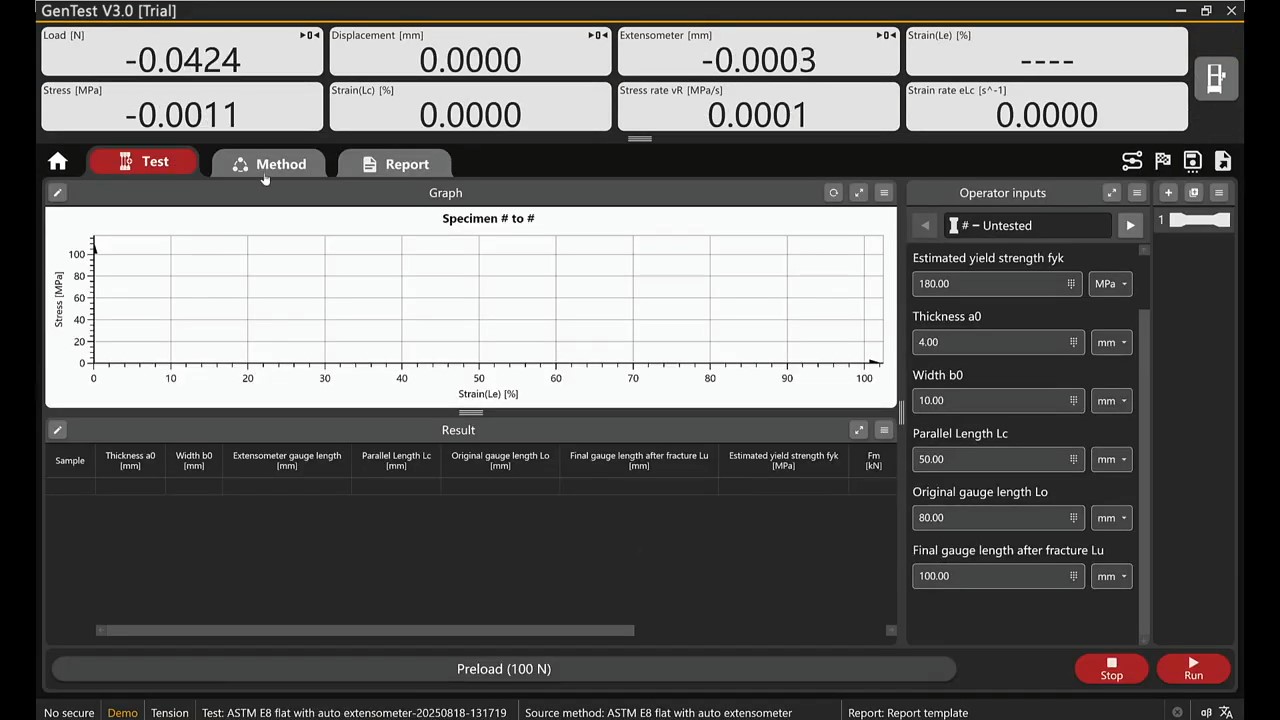
04:59 – Creating a Demo Test Method
At 04:59, the walkthrough creates a demo test method. The sequence starts in TEST, then moves to Create a New Method. The example used in the video is ASTM E8 Flat with Auto Extensometer, which gives the user a ready starting point for a simulated tensile test workflow.
After selecting the example method and confirming with OK, the setup moves to METHOD, where the user selects the required Test Simulation File. The test is then started from TEST with RUN. This connects three parts of the GenTest workflow: method selection, simulation file selection, and test execution.
In GenTest, a method is more than a file name. It defines how the software controls and evaluates the test. It can include the test sequence, channels, curves, calculations, and report output. The simulation file supplies the test-like data flow, allowing the user to run through the process without live machine input.
Example methods are useful starting points, especially for training or familiarization. The operator should still review the method parameters before using the setup for actual testing. For a real ASTM E8 workflow, details such as sample geometry, gauge length, extensometer setup, units, and result fields should be confirmed against the lab’s method requirements.
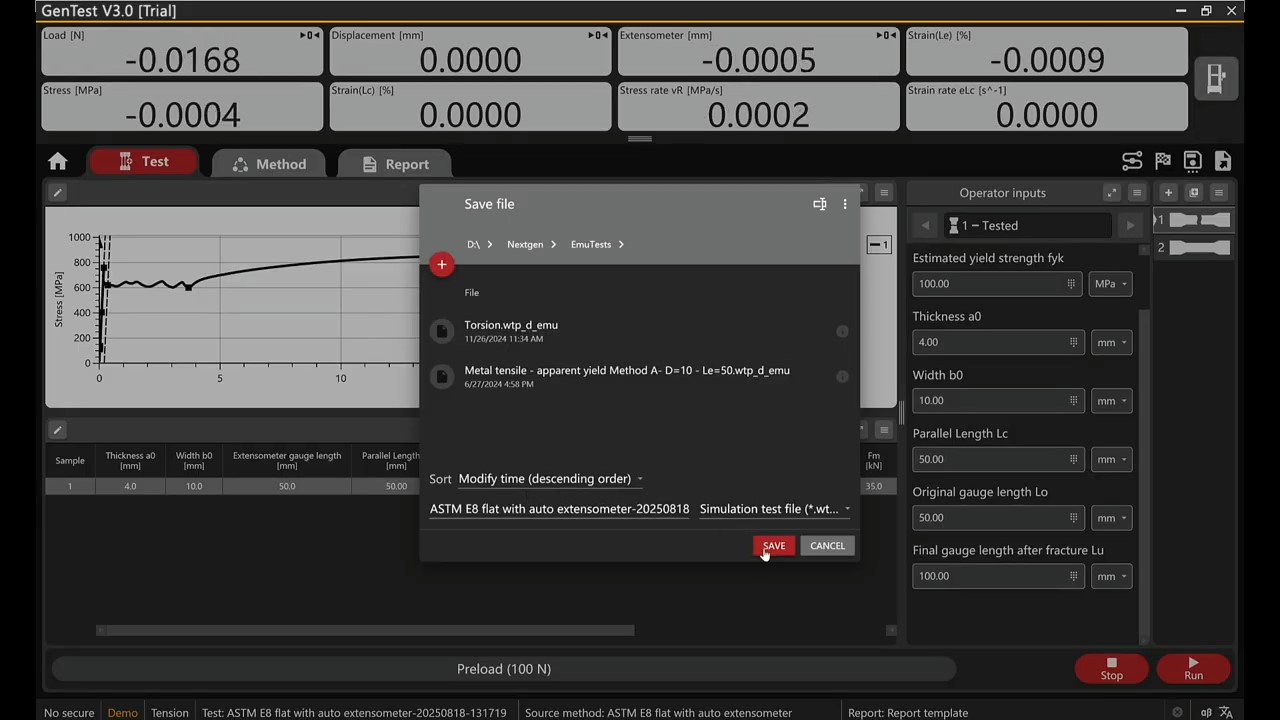
05:44 – Generating a Test Simulation File
At 05:44, the workflow shows how a test file can be turned into a demonstration file. The user opens the three-line menu, selects Generate Test Simulation File, saves the file, confirms with OK, then returns to METHOD to select and open the simulation file.
Simulation files are useful when a lab wants to repeat a test-like workflow for training, onboarding, customer demonstrations, or report template checks. Instead of requiring a live specimen and active machine connection, the simulation file lets users practice the same software sequence in a controlled way.
This helps new operators learn how to select a method, load a simulation file, start a run, and review the output before working with live equipment. Service teams can also use simulation files to demonstrate software behavior without running the UTM.
A simulation file should not be treated as a real specimen result. Store these files in a clear location and name them in a way that separates them from production test records. When running a simulated workflow, confirm that the correct file is selected and that the result is understood as training or demonstration data, not live test data.
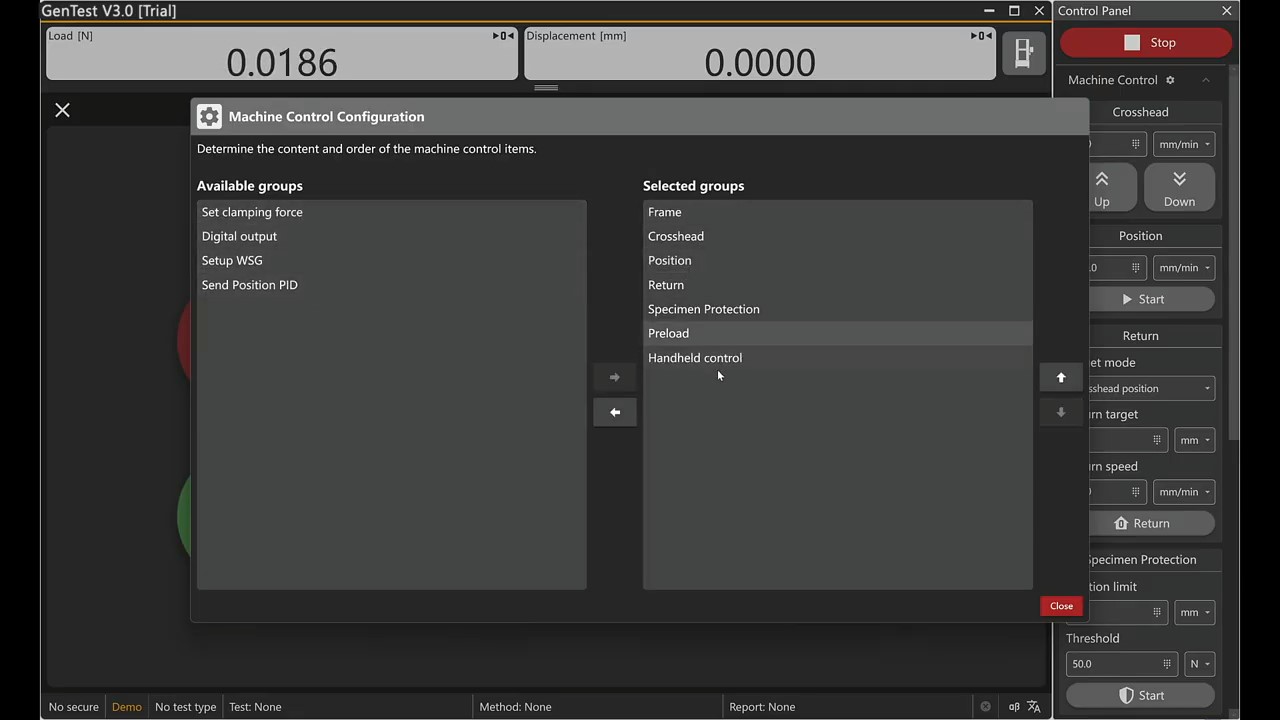
06:19 – Control Panel Setup
At 06:19, the walkthrough moves into Control Panel Settings. The user opens the UTM control area, reviews the parameter groups in the navigation panel, selects the settings icon, moves the required items from Available Groups into Selected Groups, and closes the settings window.
This step controls what the operator sees during setup and operation. The Control Panel should match the way the lab actually runs tests. A routine QC workflow may only need a smaller set of visible groups, while an advanced setup or service workflow may require more machine, method, or monitoring parameters on screen.
A clean Control Panel layout helps reduce operator confusion. If too many groups are visible, routine users may spend time navigating controls they do not need. If too few groups are visible, technicians may miss parameters needed for setup, troubleshooting, or method review.
GenTest also supports real-time monitoring, including views such as stress–strain, displacement–load, load–time, and strain–time. Control Panel setup should support that workflow by keeping the relevant machine and test parameters available during operation. The selected groups should match the operator’s actual workflow, including the parameters needed for setup, monitoring, troubleshooting, and method review.
07:02 – Running a Quick Test
At 07:02, the video introduces Quick Test. The user opens TEST, selects Quick Test, confirms with OK, adjusts the required parameters in the Quick Test Setup panel, and starts the run with RUN.
Quick Test is the fastest route for a straightforward test setup. It can be useful when a technician needs to run a simple check, perform a basic demonstration, or execute a routine procedure without building a full method from a template.
A quick setup still requires the operator to confirm the test parameters before starting the run. Depending on the test, that may include the correct fixture, load cell, speed, direction, units, specimen information, and stopping condition.
For routine QC across shifts and production lots, GenTest can support incoming inspection, batch verification, supplier qualification, material comparison, R&D comparison, process change review, and heat treatment checks. Quick Test may be useful in simple cases, but standards-based or audited workflows should normally use approved methods or validated templates instead of ad hoc setup.
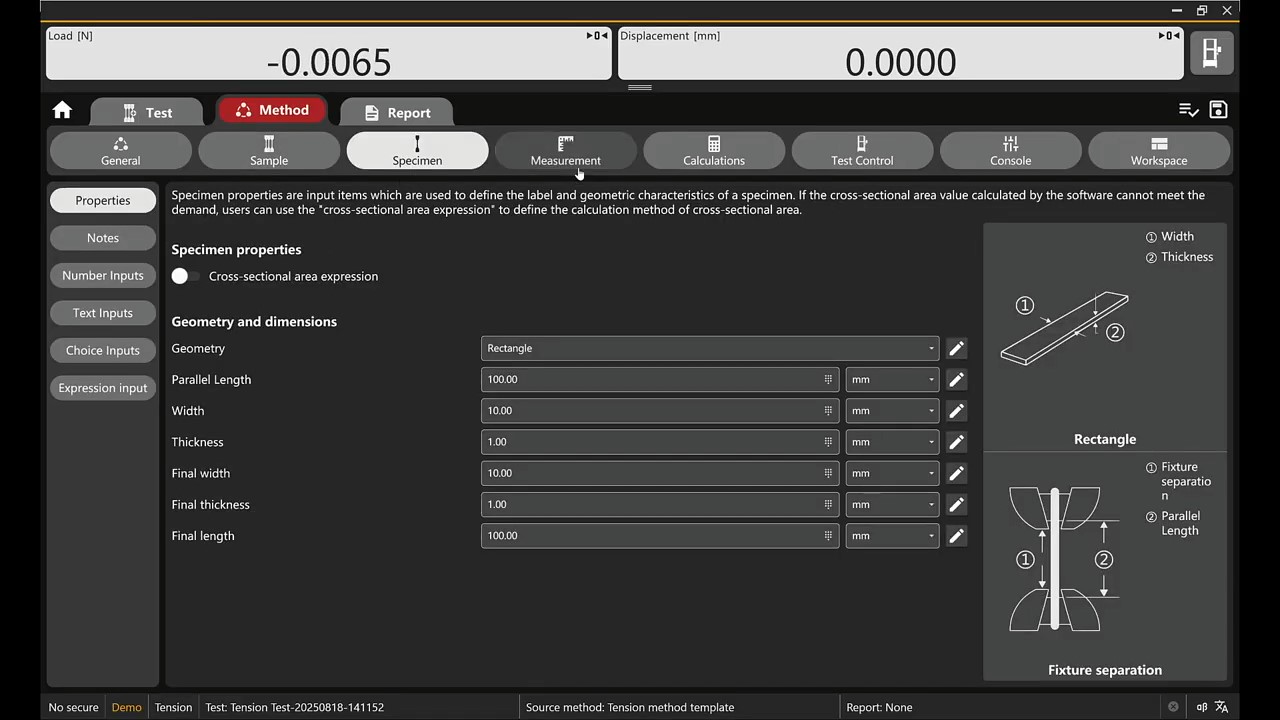
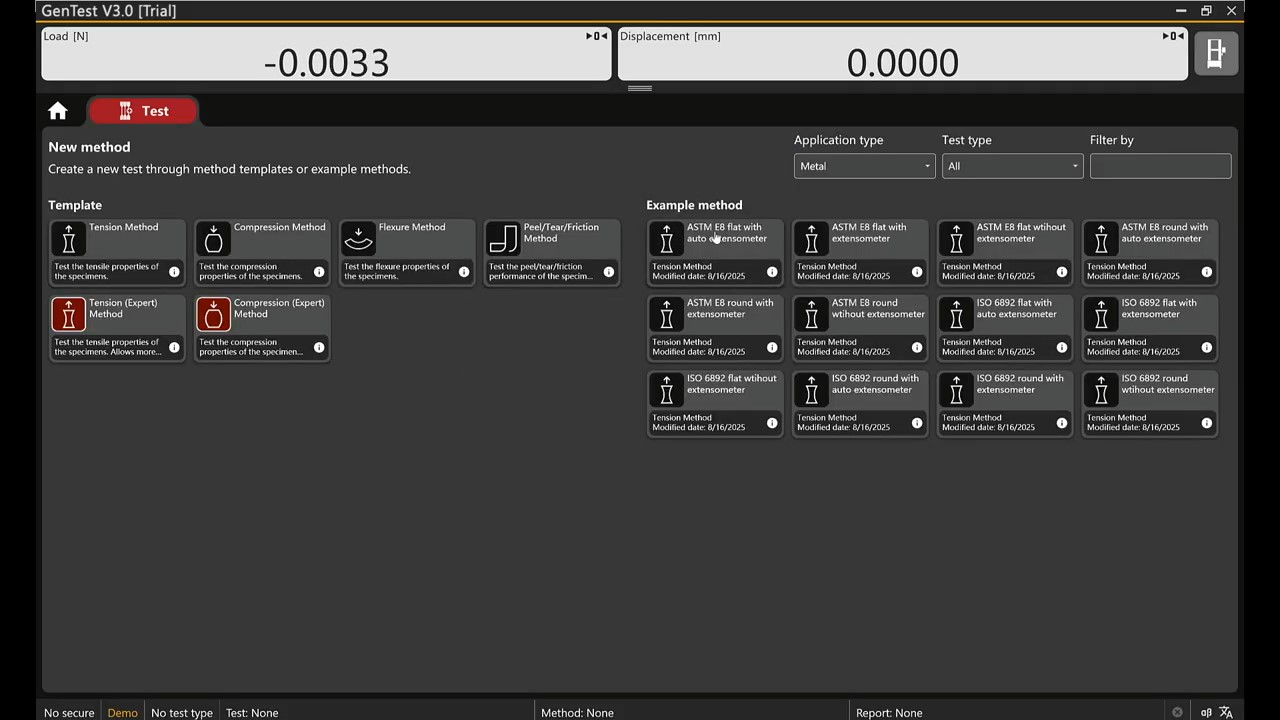
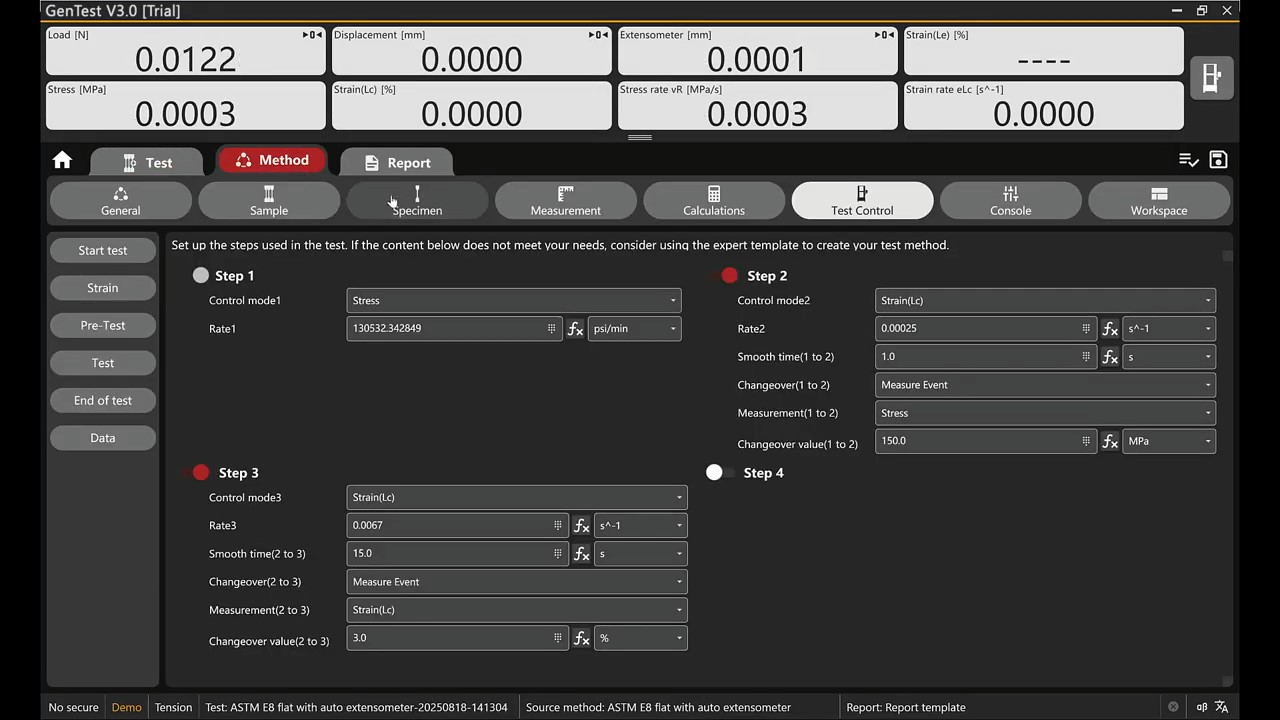
07:21 – Creating a New Method from a Normal Template
At 07:21, the workflow moves from Quick Test to structured method creation. The user opens TEST, selects Create a New Method, chooses a normal method template such as Tension Method, confirms with OK, and then works inside METHOD.
After the method opens, GenTest displays method subtabs. In the Test Control subtab, the user can enable additional steps such as Step 2, Step 3, and Step 4 to build a multi-step procedure. The method should be saved after the required test control settings are configured.
At this stage, the method controls the test sequence instead of relying on one-off operator actions. A method defines the test logic: how the test starts, how it changes between steps, which conditions control the sequence, and when the test should stop. For routine lab work, a normal template gives the user a structured starting point instead of requiring the test logic to be built from scratch.
Step-based control is especially useful when the test procedure needs more than one stage. A method can include multiple steps with different control logic or changeover conditions, depending on the test requirement. For QC and R&D teams, saving the configured method also supports repeatability, because the same method can be reused instead of rebuilt for every run.
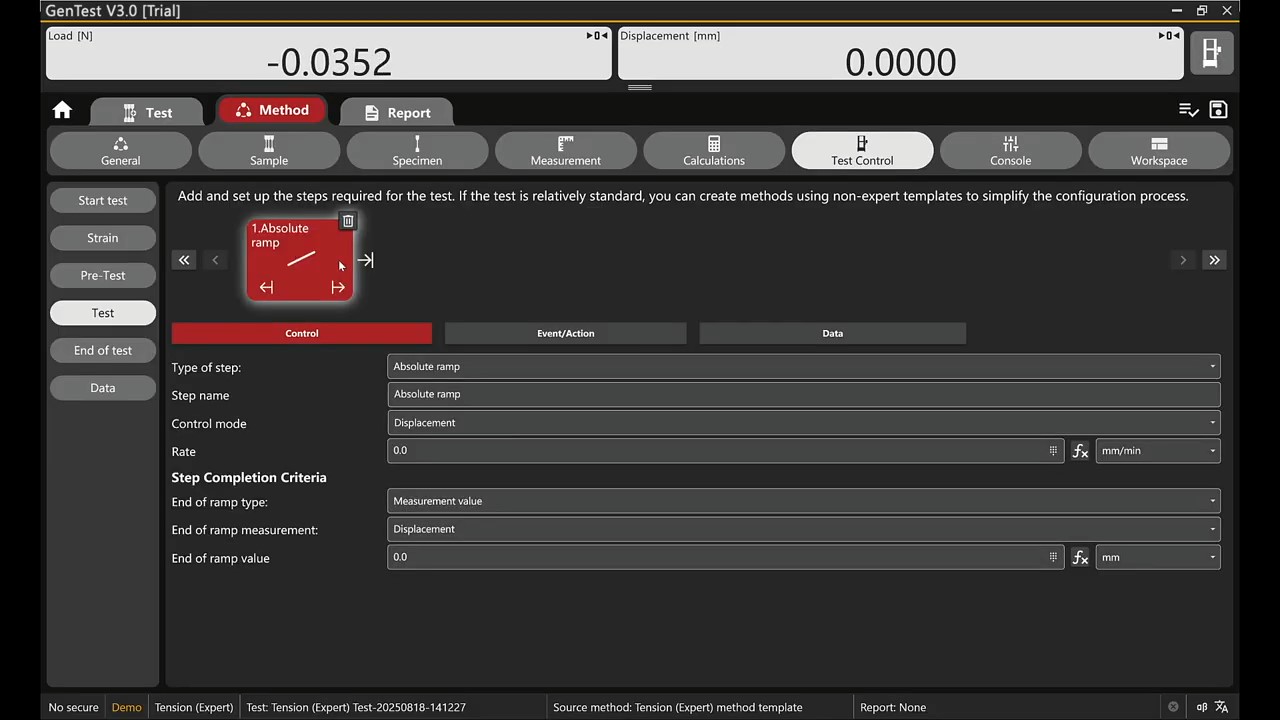
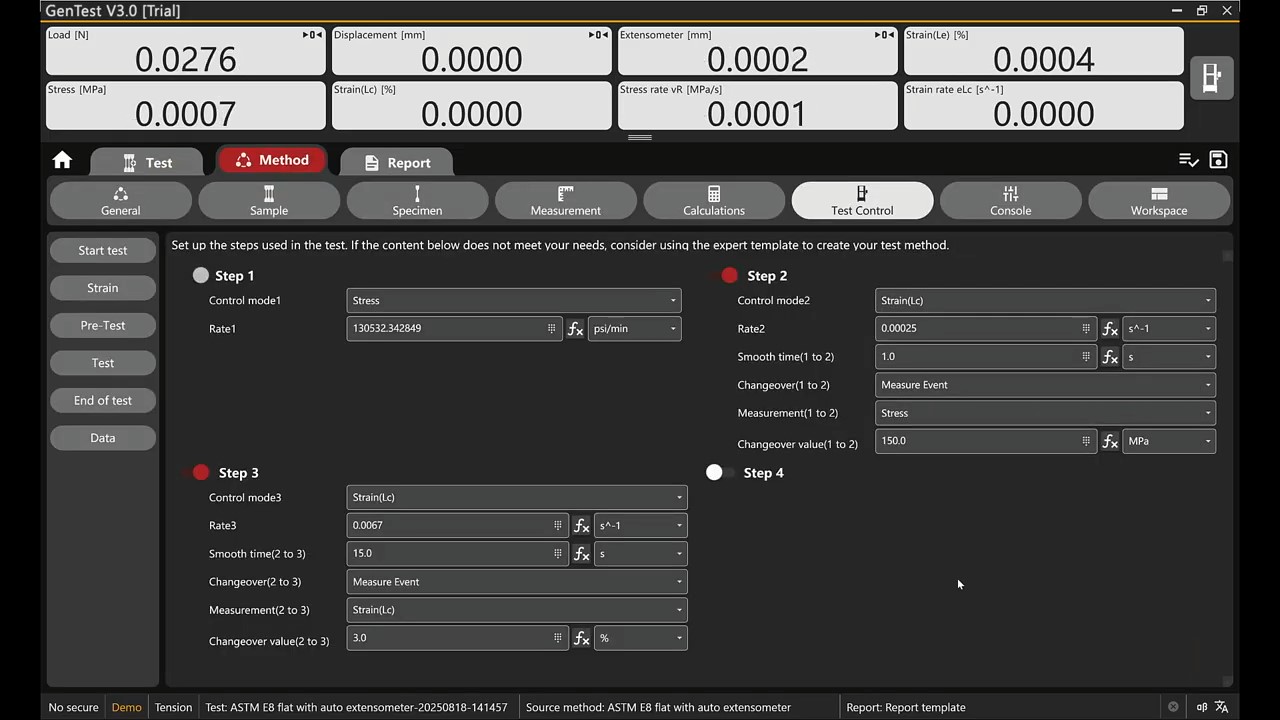
08:01 – Creating a Method from an Expert Template
At 08:01, the walkthrough moves into the Tension Expert Method workflow. The user opens TEST, selects Create a New Method, chooses Tension Expert Method, confirms with OK, and then works inside METHOD under the Test Control subtab.
Expert templates are intended for test setups that need more control than a normal template provides. This can include custom step sequences, special stopping conditions, additional data fields, alternate reporting needs, or internal lab procedures that do not fit a basic routine method.
This option is most relevant for R&D groups, advanced testing labs, and teams working with new materials or customer-specific specifications. Each step should be configured carefully, because the method controls how the machine behaves during the test and how the software interprets the result.
After configuring the required steps, save the method with a clear name. Expert method editing should normally be limited to trained users, especially in labs where approved methods are used for production QC, supplier qualification, or formal reporting.
08:44 – Creating a Method from an Example Method
At 08:44, the workflow shifts to creating a method from an example. The user opens TEST, selects Create a New Method, chooses an Example Method such as ASTM E8, confirms with OK, and then reviews the setup inside METHOD.
Example methods are useful when the lab wants to start from a known test structure instead of building a method from the beginning. GenTest supports templates and standards-based methods for common universal testing workflows, including tensile, compression, bending/flexure, and shear testing.
An example method should still be reviewed before it is used for a real specimen. The operator should confirm the specimen dimensions, units, test speed, sensor selection, extensometer or displacement source, calculations, report fields, and any customer or standard-specific requirements.
If the method is adjusted for a specific lab procedure, save a lab-specific copy rather than overwriting the original example. This keeps the example available as a reference and makes the modified method easier to identify during future testing.
09:12 – Running a Test from History Methods
At 09:12, the workflow moves to History Methods, where the user can reopen a previously configured method. The user opens TEST, selects Browse, chooses the required file from the history methods list, selects OPEN, confirms with OK, and then reviews the setup inside METHOD.
History Methods are useful when a lab needs to reuse a previously configured method for repeated work. This can save setup time and improve consistency across production QC, recurring customer jobs, supplier comparisons, or repeated material programs.
Reusing a method does not remove the need for review. The operator should confirm that the method is still valid for the current specimen, fixture setup, load cell, extensometer, report template, and standard or customer requirement. This is especially important if the previous method was created for a different material, geometry, or test condition.
GenTest keeps setup parameters, recorded data, calculations, and report output connected to the test workflow, which supports repeatability and traceability. History Methods should be treated as controlled starting points, not automatic approval to run without checking the current test setup.
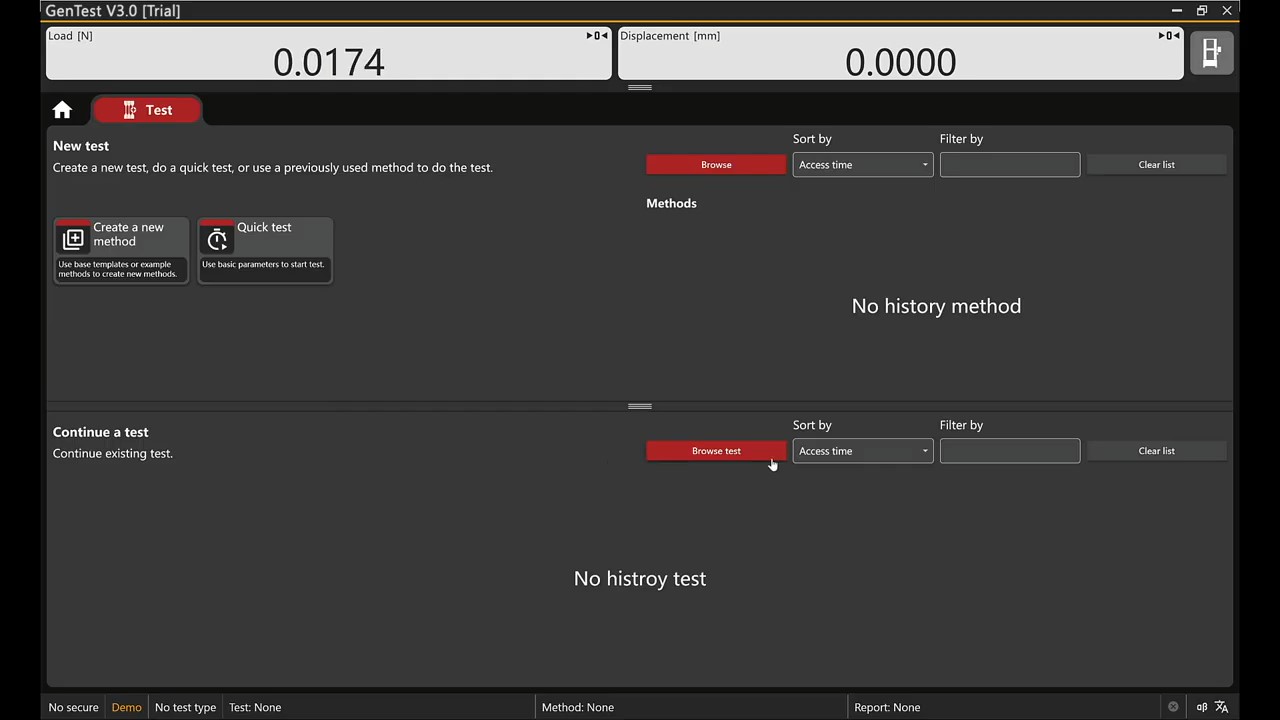
09:44 – Running a Test from History Tests
At 09:44, the walkthrough moves from History Methods to History Tests. The user opens TEST, selects Browse Test, chooses a previous test file, selects OPEN, confirms with OK, reviews the setup inside METHOD, and then runs the test.
History Tests are different from History Methods. A history method reuses a configured method. A history test references a previous test record, which can be useful when the lab needs to repeat a similar job, compare results, troubleshoot a setup, or review how a previous sample was tested.
Before using a previous test as the starting point, confirm that the earlier setup still applies to the current specimen. Check the sample details, method, fixtures, sensor selection, units, report template, and operator information. Keeping the correct sample ID, batch number, operator, date, method, and machine information is important for clean traceability.
This is useful for repeat programs, comparison work, and troubleshooting, but the new run should still be reviewed and documented as its own test record.
What GenTest Controls During a UTM Test
GenTest controls more than the screens used during setup. During a UTM test, it connects method setup, controller communication, live signal acquisition, test control, calculations, and reporting in one workflow.
In a typical UTM test, GenTest connects the PC to the machine controller and sensor system. During the run, the software collects force, displacement, and strain data in real time. Those signals are then displayed as live curves and converted into mechanical test results according to the selected method.
From Machine Movement to Reportable Results
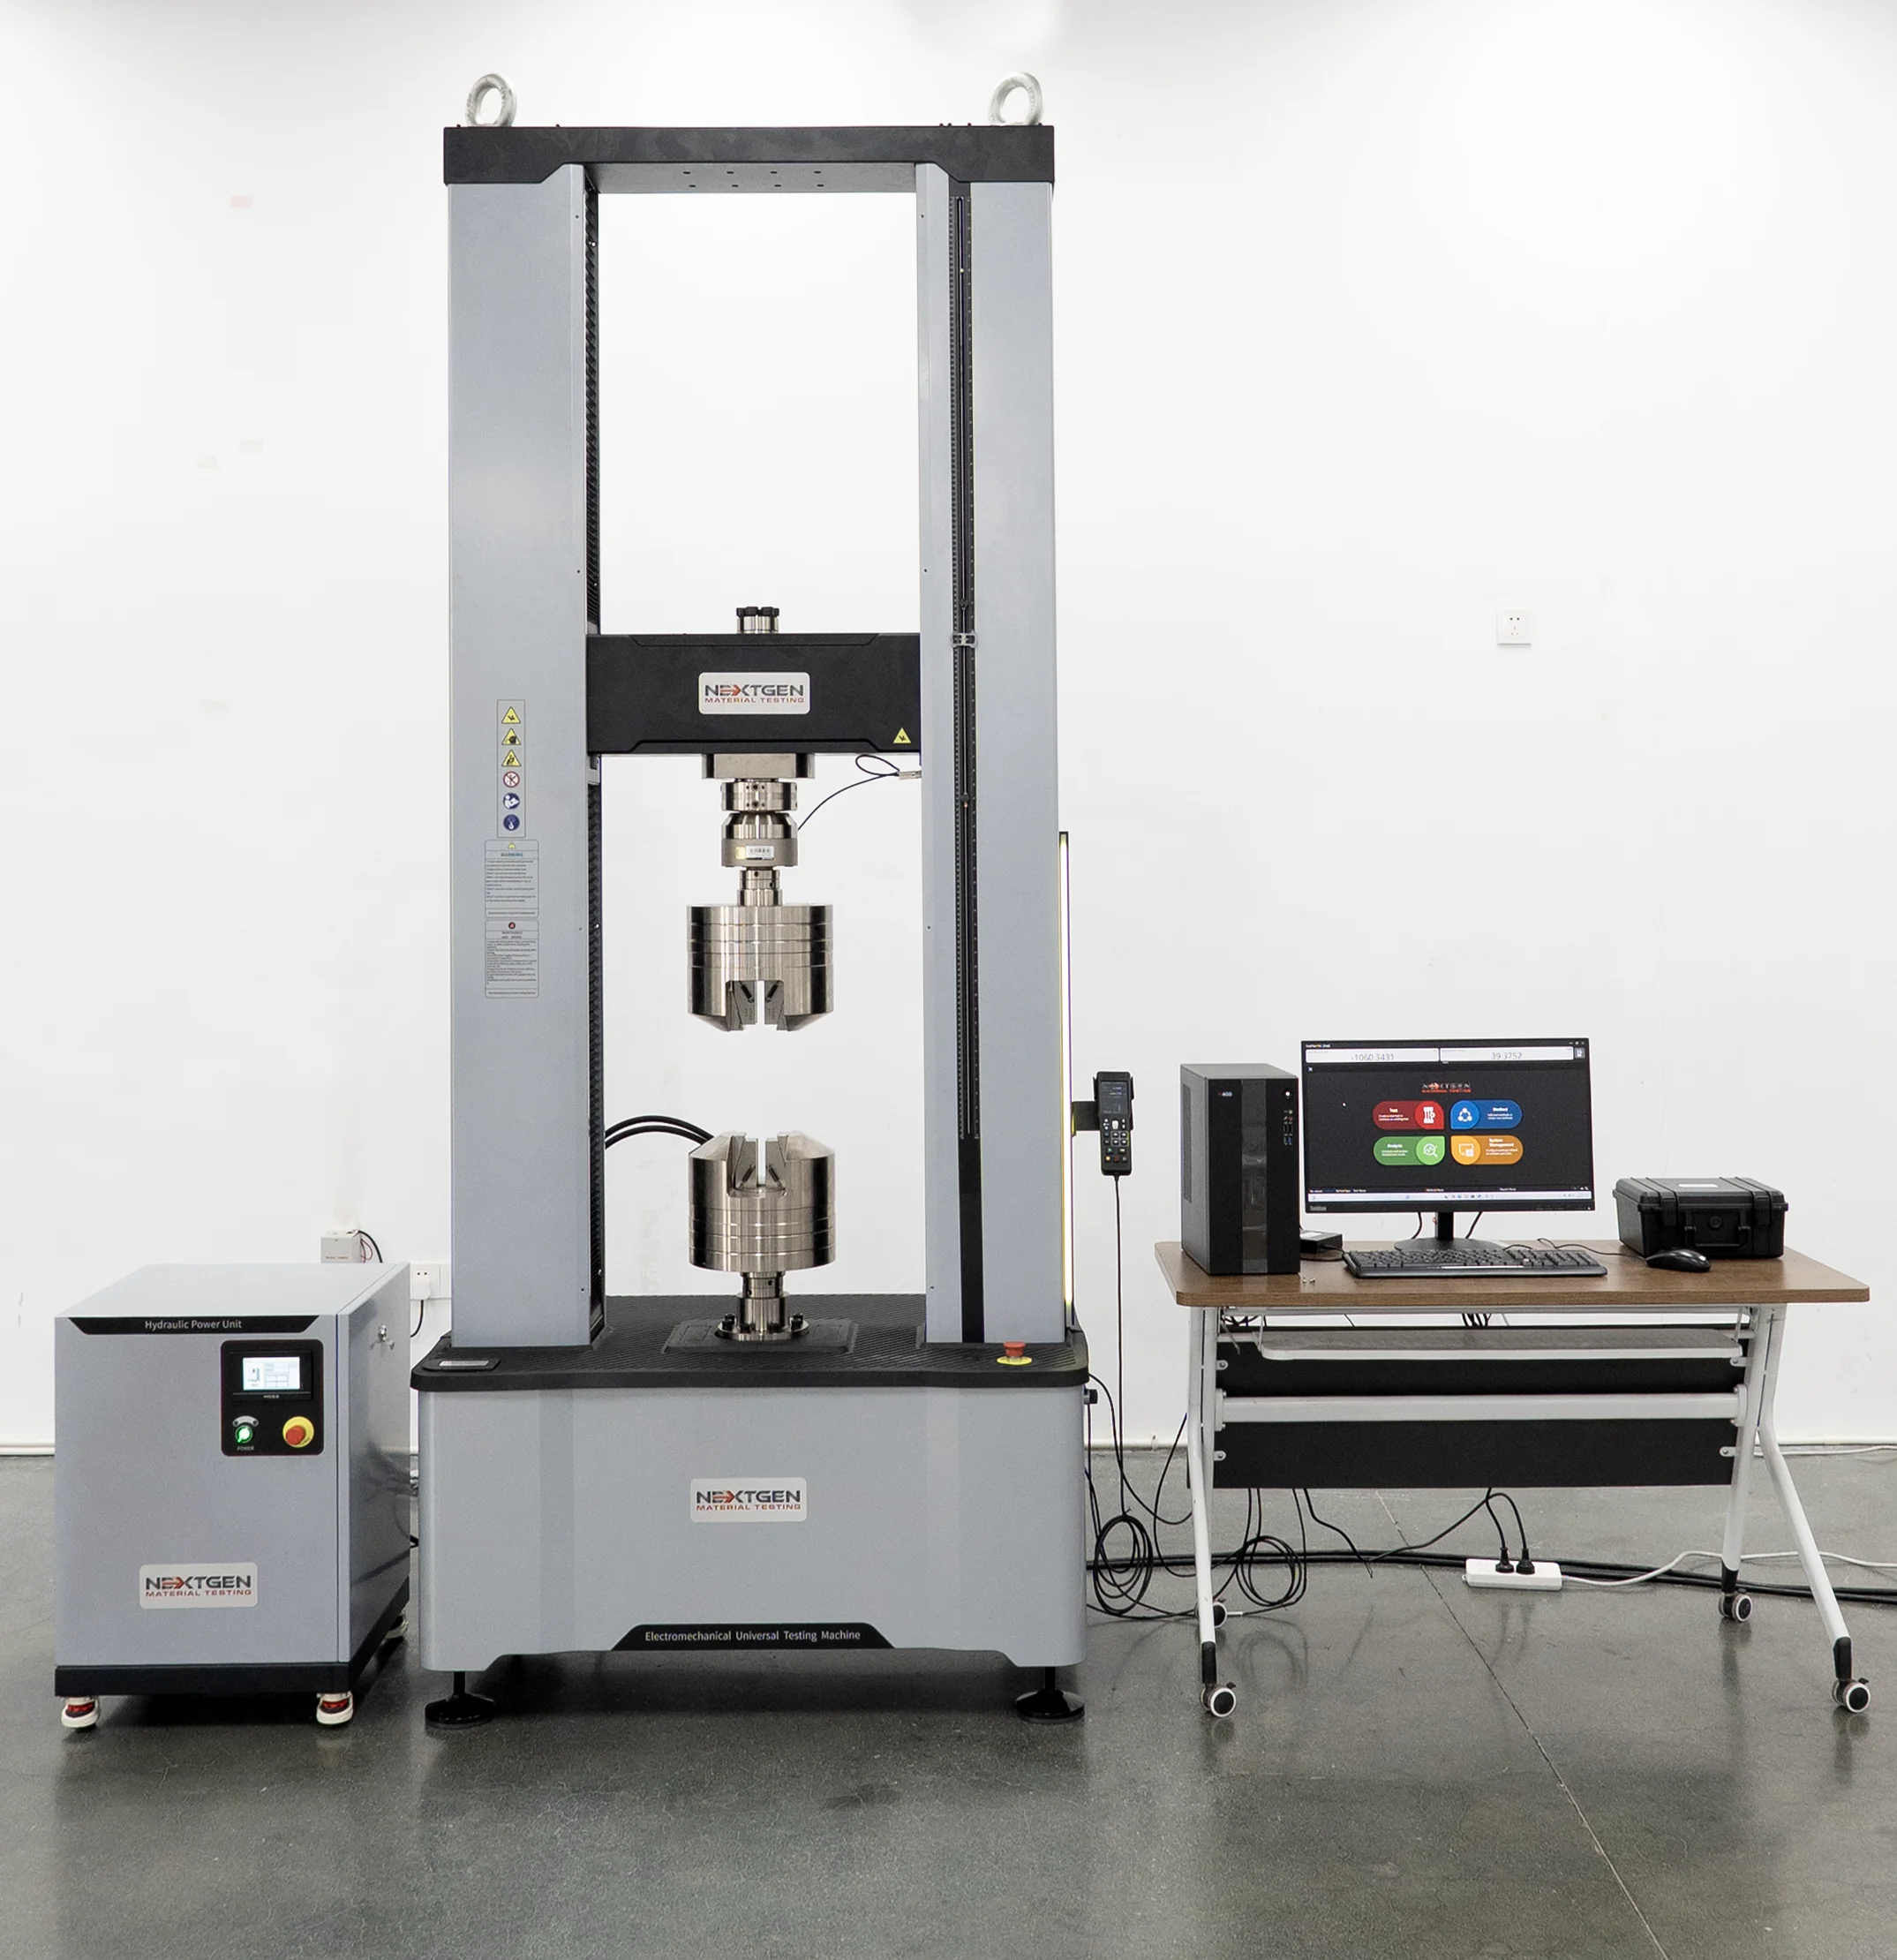 The controller handles the machine movement and test control. The sensors capture the measured response from the specimen. GenTest brings those pieces together in the software interface, where the user can monitor curves such as stress–strain, displacement–load, load–time, or strain–time.
The method defines how the test should run and which values should be calculated. Depending on the setup, this may include step-based control, stopping conditions, result calculations, data fields, and report formatting. Method setup affects both the physical test sequence and the final output.
Once the test is complete, GenTest keeps the recorded data, calculated results, and report/export output connected to the same workflow. For QA/QC labs, this supports routine inspection, batch verification, and supplier comparison. For R&D teams, it helps compare materials, process changes, heat treatment conditions, or test method adjustments using consistent data and report structure.
Quick Test, Templates, Example Methods, and History Files: What to Use When
The final part of the setup video shows several ways to start or build a test in GenTest. Each option serves a different purpose, depending on whether the lab needs a fast run, a structured method, an advanced sequence, a standards-based starting point, or a repeatable setup from previous work.
| Option | Best Used For | Notes |
| Quick Test | Simple or fast setup | Useful for basic runs, checks, or demonstrations; not the best choice for validated standard methods |
| Normal Template | Routine lab method | Provides a structured setup for common test workflows |
| Expert Template | Advanced or custom methods | Gives more control over test steps, conditions, and method behavior |
| Example Method | Starting from a known standard-like setup | Saves time, but still needs review for the current sample and lab requirements |
| History Methods | Reusing a previous method | Useful for repeated jobs and consistent production or customer workflows |
| History Tests | Referencing previous test records | Useful for repeat work, comparison, troubleshooting, or similar sample programs |
Quick Test is the fastest route when the operator needs a simple setup. A Normal Template is better when the lab needs a repeatable method with a defined structure. An Expert Template is useful when the test requires custom step logic, special stopping conditions, or non-routine method behavior.
Example Methods help when the lab wants to start from a familiar test structure, such as a standard-like tensile method, but they should not be treated as final without review. The operator still needs to confirm specimen geometry, units, sensors, extensometer or displacement source, calculations, and report fields.
History Methods and History Tests are useful for repeat work, but they serve different purposes. History Methods reuse a previous method setup. History Tests reference previous test records, which can help with comparison, troubleshooting, or repeating a similar sample program. In both cases, the current specimen and test requirements should be checked before running the test.
Reporting, Export, and Traceability in GenTest
For lab managers, reporting is part of test control, data review, and traceability. GenTest keeps the method, operator input, raw data, calculated results, curves, and report output connected so the lab can review how a result was produced.
Report Templates
GenTest can generate standardized test reports using report templates. A report can include the test method, sample information, operator details, machine information, calculated results, and the curves or graphs needed for review. This helps labs keep reports consistent across operators, shifts, projects, and customer requests.
A report template should match the lab’s documentation requirements. For routine QC, that may mean sample ID, batch number, operator, date, method, result values, and pass/fail criteria. For R&D work, the report may need more curve detail, comparison data, or additional calculated fields.
Data Export
GenTest supports report and data export for different use cases. PDF reports are useful when the lab needs a fixed document for review, storage, or customer submission. Excel or CSV exports are useful when results need to be compared across batches, lots, materials, or process conditions.
Raw data exports are especially useful for R&D or advanced analysis. They allow engineers to review curve behavior, compare test stages, or process the data outside the main software environment when needed.
Traceability
Traceability depends on keeping the result connected to the conditions that produced it. A GenTest record can include sample ID, batch number, operator, date, method, and machine information. That connection helps the lab trace a final report back to the original test setup, operator actions, and recorded data.
For QA/QC labs, this supports routine inspection, supplier approval, batch verification, and customer documentation. For R&D teams, it helps compare materials, heat treatment conditions, process changes, or method adjustments without losing the context behind each result.
User Permissions and Data Integrity
User management affects how a lab controls methods, results, and system changes. A single login may be enough for a demo, but a working QA/QC or R&D lab usually needs separate access levels.
Operators can run approved methods, enter specimen information, review results, and generate reports. Supervisors or lab managers may manage methods, review results, and approve changes. Administrators control user accounts, security settings, and system configuration.
This separation helps prevent accidental changes to validated methods, calibration-related settings, or report templates. It is especially useful in labs with multiple shifts, multiple operators, or recurring customer and supplier testing.
Separate logins also support traceability. If a result needs to be reviewed later, the lab can check who ran the test, when it was performed, which method was used, and which sample information was entered.
Demo Mode and Simulation Files for Training
DEMO Mode, demo method creation, and simulation files are part of the same training workflow. Together, they allow users to practice the GenTest process without connecting to the testing machine or running a live specimen.
DEMO Mode lets operators move through the software workflow in a simulated environment. A simulation file gives the software test-like data, so users can practice method selection, run sequence, curve review, and reporting. This is useful for onboarding, internal training, customer demonstrations, and checking report templates before live testing begins.
Simulation is also useful when a lab needs to train several users without occupying the UTM or preparing real specimens. Operators can learn the interface first, then move to live testing after they understand the method workflow and required setup checks.
DEMO Mode and simulation files are training tools. They do not confirm load cell calibration, machine alignment, fixture setup, safety devices, or real specimen behavior. Those checks must be completed during live machine setup and test validation.
GenTest Setup Checklist Before Running a Real Test
Before moving from setup or simulation into live testing, confirm the main software, machine, and method items are ready.
- GenTest is installed and opens correctly.
- The license is activated, or Trial Version is being used intentionally.
- The workspace path is set to the correct controlled location.
- The UTM controller is connected through Ethernet.
- The PC IP address is in the correct range for the controller.
- The safety shield is connected and configured according to the machine instructions.
- The LED strip, USB driver, and COM port are configured if that hardware is used.
- User accounts and permissions are set.
- The correct method, template, example method, or history file is selected.
- Specimen information is entered correctly.
- Fixtures, load cell, extensometer, and sensors match the test setup.
- Control Panel shows the groups required for the workflow.
- Report template and export settings are ready.
- DEMO Mode or simulation mode is disabled before live testing, unless a simulated run is intentional.
A short checklist like this helps operators and service teams catch setup issues before the machine is used with a live specimen.
Additional Setup Notes for Temperature Controller, Furnace or Climatic Chamber, and DTC500
 The setup scope also includes Temperature Controller configuration for furnace or climatic chamber control and DTC500 configuration for hardware setup, calibration, and PID tuning. These items apply to systems that include temperature-dependent testing or additional controller hardware.
Some GenTest installations may include a temperature controller, furnace, climatic chamber, or DTC500 module. These components should be configured according to the exact machine configuration, test method, and hardware documentation. For temperature-dependent testing, the lab should confirm communication, temperature control behavior, safety settings, calibration status, and method requirements before running specimens.
Calibration and PID tuning should follow official service or manual instructions. Specific wiring steps, PID values, calibration values, and temperature controller procedures depend on the system configuration. If the setup includes furnace control, climatic chamber control, or DTC500 hardware, confirm those steps with the official documentation or NextGen support before running temperature-dependent tests.
Getting the Right GenTest Setup for Your UTM Workflow
The correct GenTest setup depends on the UTM model, controller connection, license status, test methods, reporting requirements, and any additional hardware used with the system.
If any setup item is unclear, confirm it before running live tests. This includes cases where license activation fails, the serial number or hardware ID is unclear, the UTM controller does not connect, the IP setup is not working, the safety shield is not recognized, or the LED strip does not appear under the correct COM port.
NextGen can also help when method templates, report templates, export settings, DTC500 setup, temperature controller configuration, or compatibility with an existing UTM need to be confirmed. These details affect how the software communicates with the machine, how tests are controlled, and how results are recorded for QA/QC or R&D work.
To confirm the setup, send NextGen your UTM model, controller type, software version, license details, hardware configuration, and test method requirements. These details help the support team verify the GenTest configuration for your testing workflow.