Metallography reveals how a material is built inside. Grains, phases, inclusions, and pores shape real performance. You only see them truthfully when the surface is prepared correctly. Every step matters because each one fixes damage from the previous step. The result is a clean cross-section that reflects the material, not the tooling.
Labs follow a simple path that demands discipline. First comes cutting, then mounting, grinding, and polishing. Cleaning happens between steps to prevent cross-contamination. Etching follows to bring out grain boundaries and phases. Finally, microscopy and measurements translate the surface into data.
One small mistake can distort the picture. Overheating a steel coupon during cutting can mimic a hardened layer that never existed. A soft mount can round edges and hide thin coatings. Skipping a fine polish may leave a deformed skin that masks real microstructure.
Good preparation pays off in analysis. Optical microscopes handle magnifications up to about 1000×. SEM and EBSD go further, but only if the surface is flawless. That said, the craft starts long before the microscope. It starts at the saw, with coolant, feed, and restraint.
Metallography and What It Reveals
 Metallography studies how materials are built on the inside. The polished cross-section of a metal shows shows how the atoms organize themselves during casting, rolling, or heat treatment. Grains, grain boundaries, and the phases between them describe how the material will behave when stressed, heated, or exposed to corrosion.
Every micrograph tells a story. In a carbon steel, pearlite and ferrite bands trace the cooling rate after forging. In aluminum alloys, fine precipitates reveal how aging was controlled. Even small nonmetallic inclusions or voids explain why a component failed at a particular point. Metallographers read these details the way geologists read rock layers.
The same methods extend beyond metals. Ceramics show porosity and crack networks; composites display fiber distribution and bonding; thermal coatings expose adhesion and layer thickness. Powder-metallurgy materials reveal particle fusion and internal porosity, both critical to density and strength. Although these materials differ, the process of polishing and examining them follows the same logic.
Metallography is not limited to academic research. It is part of industrial quality control and certification. Aerospace alloys, welded joints, and surface coatings are routinely examined to verify that they meet international standards such as ASTM E3 for preparation or ISO 1463 for coating thickness. The same procedures also check the uniformity of heat treatment and detect microstructural defects before they lead to mechanical failure.
The Full Process of Metallography Sample Preparation
There are several fundamental stages that transform a rough piece of material into a surface suitable for microscopic study. These include sectioning, mounting, grinding, polishing, cleaning, etching, and final examination. Each step builds on the one before it, forming a complete and logical sequence.
Skipping even a single stage breaks the chain. The image under the microscope might still appear sharp, but it will not reflect the real structure. Heat from poor cutting, contamination between steps, or incomplete polishing can all distort what you see. True metallographic accuracy exists only when every stage is done carefully and in order.
Let’s look closer at each stage: how it works, what it corrects, and why it matters for revealing the material’s genuine structure.
Stage 1: Sectioning – Precise Cutting without Structural Damage
Every metallographic examination begins with sectioning. This is where the sample’s integrity is first tested, not under the microscope, but at the saw. The goal is simple: isolate a small, representative piece without changing its internal structure. The challenge lies in doing that without heat, stress, or deformation that could alter what the microscope will later reveal.
 In practice, most laboratories rely on wet abrasive cutting, where a rotating wheel continuously cooled by fluid removes material smoothly and keeps the temperature low. When performed correctly, the disturbed layer beneath the cut is less than a fraction of a millimeter thick, preserving the original grain structure. For delicate or extremely hard materials, diamond wafer cutting provides higher precision. The thin diamond blade slices slowly but cleanly, ideal for ceramics, carbides, or electronic parts. When a large sample must be reduced to size, a band saw may be used, though its rougher finish demands additional grinding afterward.
Choosing the right cutting wheel depends on hardness. Hard materials require a softer-bonded wheel to release dull abrasive grains and maintain sharpness. Softer metals, in contrast, are cut with harder-bonded wheels that prevent clogging. Coolant flow is crucial. It removes debris, controls heat, and may contain inhibitors to prevent oxidation on freshly exposed metal. Without proper cooling, localized heating can form a false heat-affected zone that misrepresents the material’s condition.
Operators maintain steady feed pressure and moderate speed, avoiding sudden force that might bend or smear the metal. Thick or heat-sensitive parts often benefit from pulse cutting, short intervals that let the material cool, or step cutting, which removes thin layers gradually. Dull wheels are avoided entirely, as vibration and friction quickly lead to microcracks.
Stage 2: Mounting – Stabilizing and Protecting the Specimen
After sectioning, the specimen must be stabilized for the steps that follow. Mounting serves both safety and precision. It gives the operator a solid grip during grinding and polishing and protects the fragile edges that could chip or deform under pressure. Without proper mounting, small samples are difficult to handle and risk losing their geometry before the analysis even begins.
 Two main techniques are used: hot compression mounting and cold mounting. In hot mounting, the sample is placed inside a mold filled with thermosetting or thermoplastic resin. Under heat and pressure, the resin softens, flows around the specimen, and then hardens into a compact block. Phenolic resins are commonly used for general work; epoxy types are chosen when better edge retention and minimal shrinkage are required.
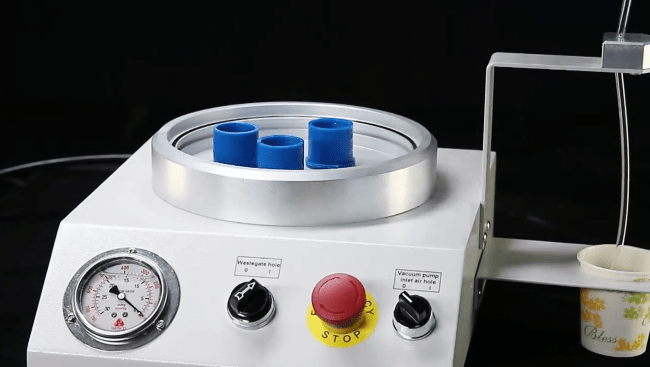
Cold mounting takes a different route. Here, liquid epoxy or acrylic resin is poured over the sample at room temperature. It solidifies without external pressure, making it suitable for heat-sensitive or irregularly shaped specimens. Epoxy resins shrink less and bond more strongly, which helps preserve fine edges and fill microgaps. When porosity is an issue, as with cast iron, sintered metals, or coatings, vacuum impregnation can be added to pull the resin deep into pores and remove trapped air. This prevents pull-out and edge rounding later.
Common issues arise when preparation is rushed. Air bubbles, uneven resin mixing, or choosing a resin much softer or harder than the specimen can create voids or wear mismatches. Cleaning the sample before embedding and applying a mold release agent in hot presses prevent most of these defects. Each mount should be labeled immediately after curing, keeping orientation and identity clear for future reference.
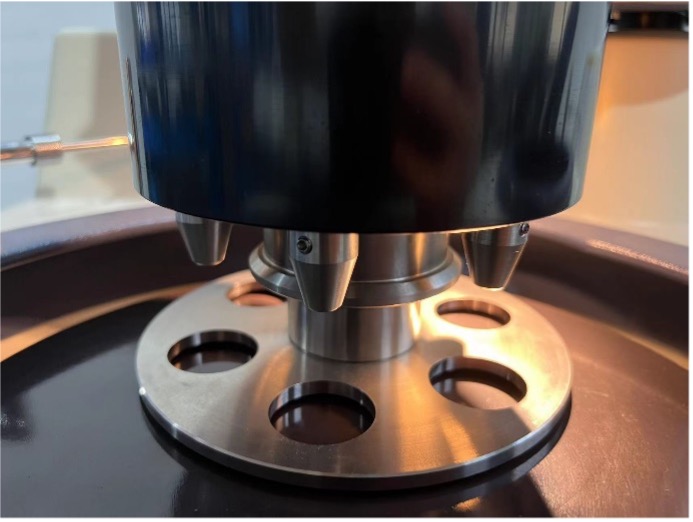
Stage 3: Grinding – Removing Damage and Achieving Planarity
Grinding defines the quality of everything that follows. Its task is to remove the layer damaged during cutting and to leave a flat, uniform surface ready for polishing. Each pass must erase the traces of the previous one, step by step reducing deformation until only the real structure remains beneath.
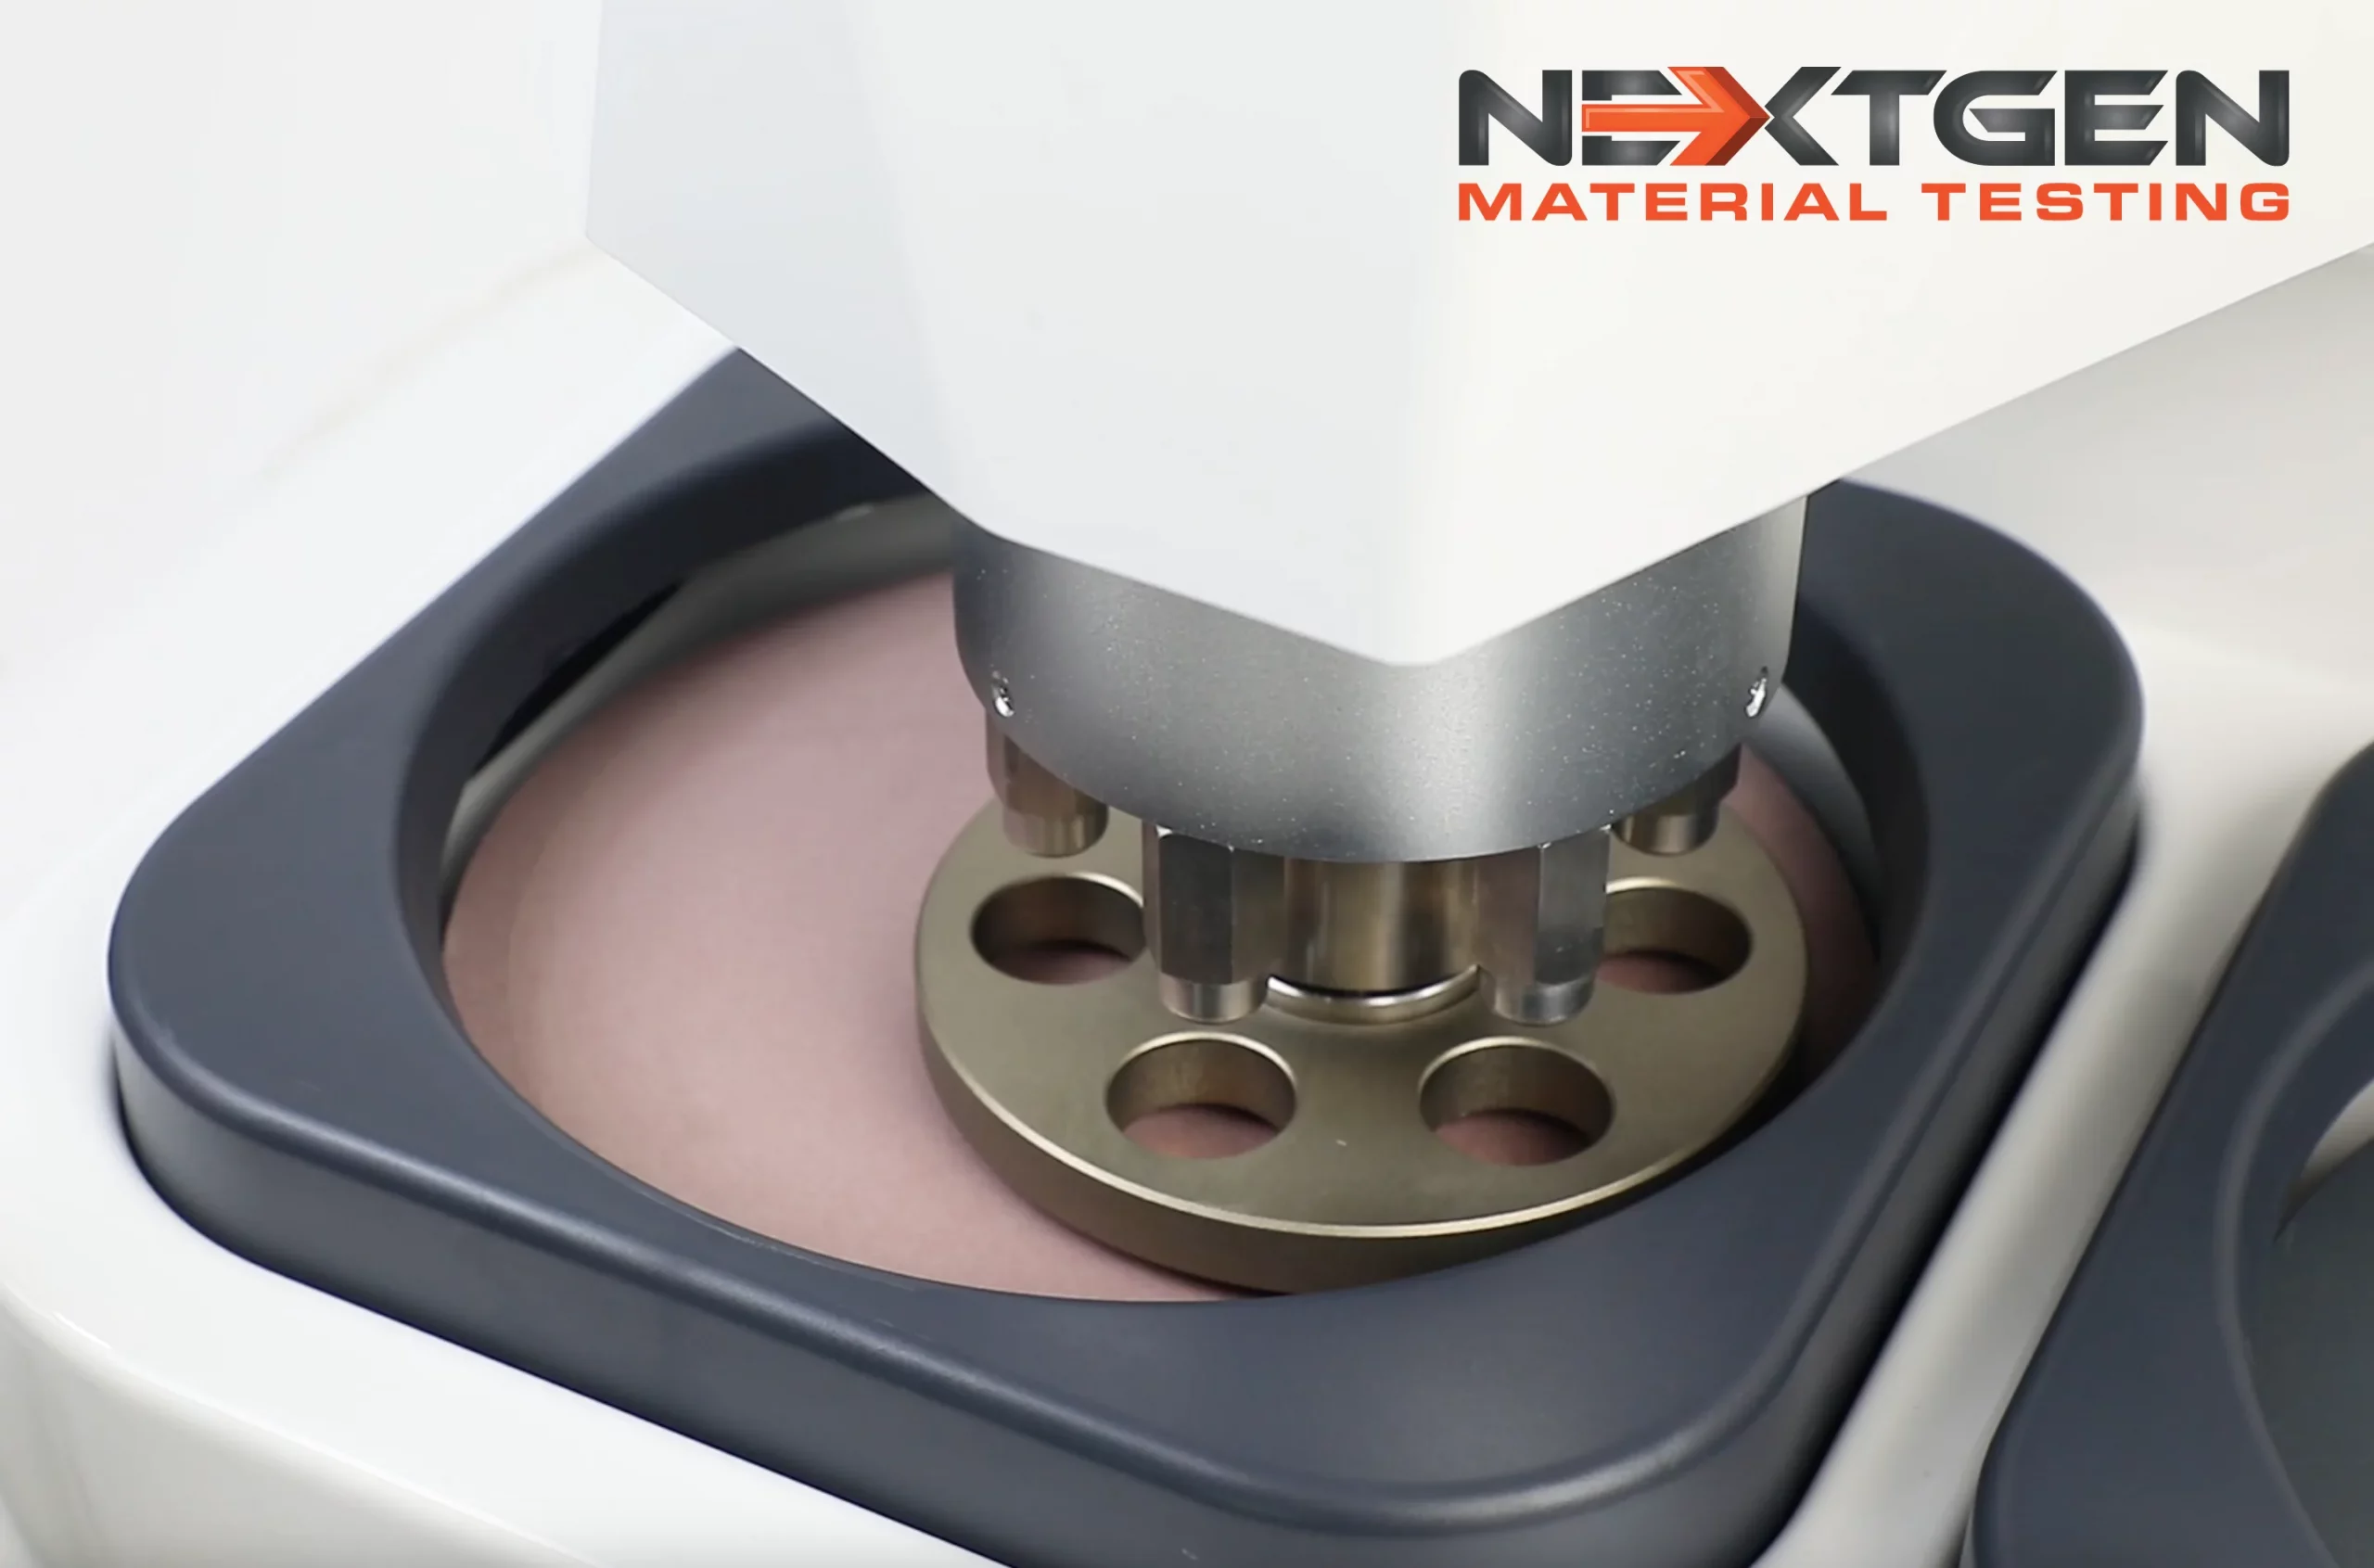 The process begins with plane grinding. Coarse abrasives, usually silicon carbide (SiC) papers, quickly even out the surface and remove saw marks. The specimen is kept wet to cool the contact area and wash away debris. Water or lubricant flow must be continuous; without it, friction builds heat and changes the metal’s microstructure. After the surface becomes flat and consistent, grinding continues with finer papers—400, 600, 800 grit, and sometimes beyond. At every transition, the orientation of the sample is rotated by ninety degrees to distinguish the new scratch pattern from the old. Only when all coarse marks are gone can the operator move forward.
Fine grinding refines the surface further. Resin-bonded diamond disks often replace SiC for this step, providing sharper cutting action and longer life. The key is control. Pressure should remain steady, feed gentle, and the surface always flushed clean. Too much force leaves deep scratches or localized heating, while insufficient cooling can harden or smear soft alloys.
Stage 4: Polishing – Creating a Mirror-Like Surface
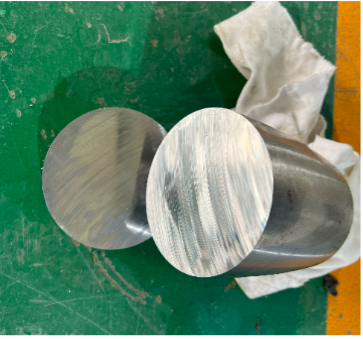
Polishing transforms a dull ground surface into a smooth, reflective plane where the true microstructure becomes visible. Its main goal is to remove the thin layer of deformation left after grinding and erase every trace of scratches without introducing new ones. This stage determines how clearly grains, inclusions, and boundaries will appear under the microscope.
 The process begins with rough polishing, typically using diamond suspensions between six and three microns on a medium or short-nap cloth. The diamond particles cut efficiently through hardened alloys and ceramics while maintaining surface flatness. Once the scratches from fine grinding disappear, final polishing follows. This uses one-micron diamond or even finer abrasives such as colloidal silica around 0.05 µm. On soft materials, silica or alumina works better than diamond, as it removes the deformation layer more gently and avoids surface relief.
Each polishing step must be carried out with care. The cloth should be moist but not flooded, and the suspension fresh to maintain cutting efficiency. Pressure remains light, especially in the final stages, to prevent smearing or pull-out of softer phases. Between steps, the specimen must be rinsed thoroughly to prevent coarse particles from contaminating the next surface. Neglecting this simple habit often leads to fine scratches that reappear under the microscope when everything seems finished.
Common artifacts include smearing, where ductile metals spread over harder phases; relief, when softer regions polish faster than hard ones; and pull-out, when brittle inclusions detach. Contamination or dried slurry can also leave stubborn marks that resemble real structural features.
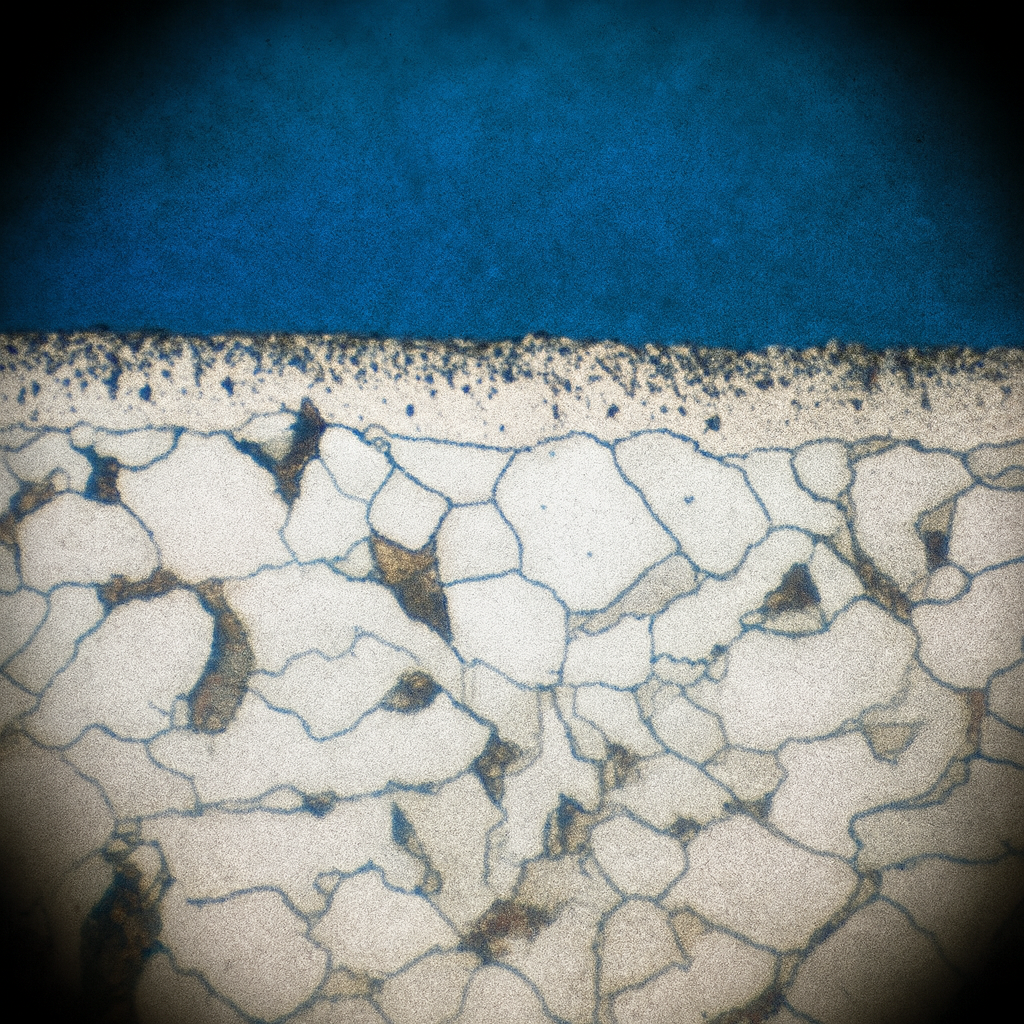
Stage 5: Etching – Revealing the True Microstructure
After polishing, the specimen’s surface may look flawless, yet it hides the very structure we seek to study. Etching brings that hidden landscape to light. By selectively attacking or coloring the surface, the process exposes grain boundaries, secondary phases, and inclusions that define how a material behaves in service.
 Two main approaches are used: chemical etching and electrolytic etching. Chemical etching involves applying a reactive solution directly to the polished surface, either by immersion or swabbing. Immersion is simple and effective for most steels and copper alloys, while swab etching is preferred for metals that form passive oxides, such as stainless steel, aluminum, and titanium. The mechanical motion of wiping helps break down the oxide film and allows the reagent to react evenly.
Electrolytic etching takes precision a step further. Here, the specimen acts as an electrode in a low-voltage circuit, immersed in an electrolyte specific to its alloy. The controlled electrical reaction gently dissolves the surface layer, revealing the microstructure without mechanical interference. This technique is especially valuable for materials prepared for EBSD or SEM analysis, where any deformation must be removed.
Different materials require specific etchants. Nital, a mix of nitric acid and alcohol, is a classic choice for steels. Keller’s reagent, containing hydrofluoric, nitric, and hydrochloric acids, reveals grains and particles in aluminum alloys. For titanium, a blend of hydrofluoric and nitric acids produces strong contrast between phases. Standards such as ASTM E407 provide trusted formulations and procedures for each material type.
Etching demands restraint. Under-etching can be repeated, but over-etching permanently alters the surface, dulling its polish and obscuring fine details. Once complete, the sample must be rinsed and dried immediately to stop the reaction.
Safety is inseparable from the process. Most etchants are corrosive and volatile. Proper ventilation, protective gloves, face shields, and lab coats are mandatory. Acid should always be added slowly into water, never the reverse, and some reagents like Nital must never be stored tightly sealed due to pressure buildup.
Stage 6: Microscopic Examination and Analysis
At the final stage, the specimen meets the microscope. This is where preparation turns into observation and data. A properly cut, mounted, polished, and etched sample now reveals the microstructure in its true form, the arrangement of grains, inclusions, and phases that define the material’s properties.
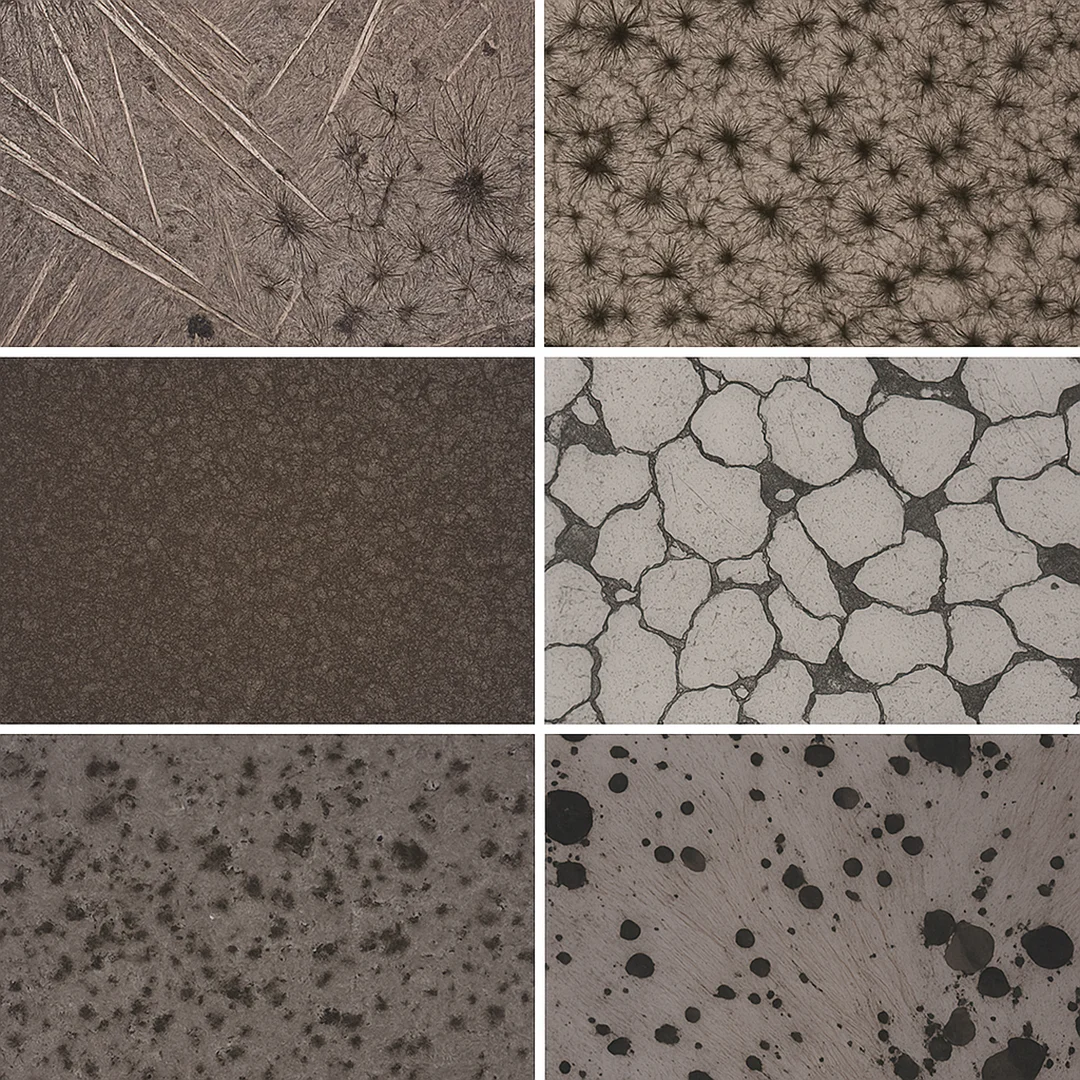 The standard instrument for this work is the reflected light optical microscope. Unlike biological microscopes, which transmit light through transparent samples, metallographic systems reflect light off the polished surface. Magnifications typically range from 50× to 1000×, allowing visualization of features as small as one micron. Under this view, grains, boundaries, and etched phases appear with clear contrast, shaped by the quality of preparation.
Different illumination modes highlight specific features. In bright field, direct reflections make flat regions appear bright while etched or uneven surfaces appear dark. Dark field inverts this logic, collecting only scattered light to make edges and small inclusions glow against a black background. Differential Interference Contrast (DIC) adds depth by translating small height differences into light and color variations, giving the image a subtle three-dimensional relief. For anisotropic metals such as titanium or zirconium, polarized light can reveal structure even without etching.
Beyond simple observation, microscopy connects to quantitative analysis. Using image analysis software, laboratories measure grain size according to ASTM E112, inclusion content following ASTM E45, or coating thickness as specified by ISO 1463. Software tools stitch images, detect edges, and calculate area fractions or porosity automatically, turning visual impressions into standardized data.
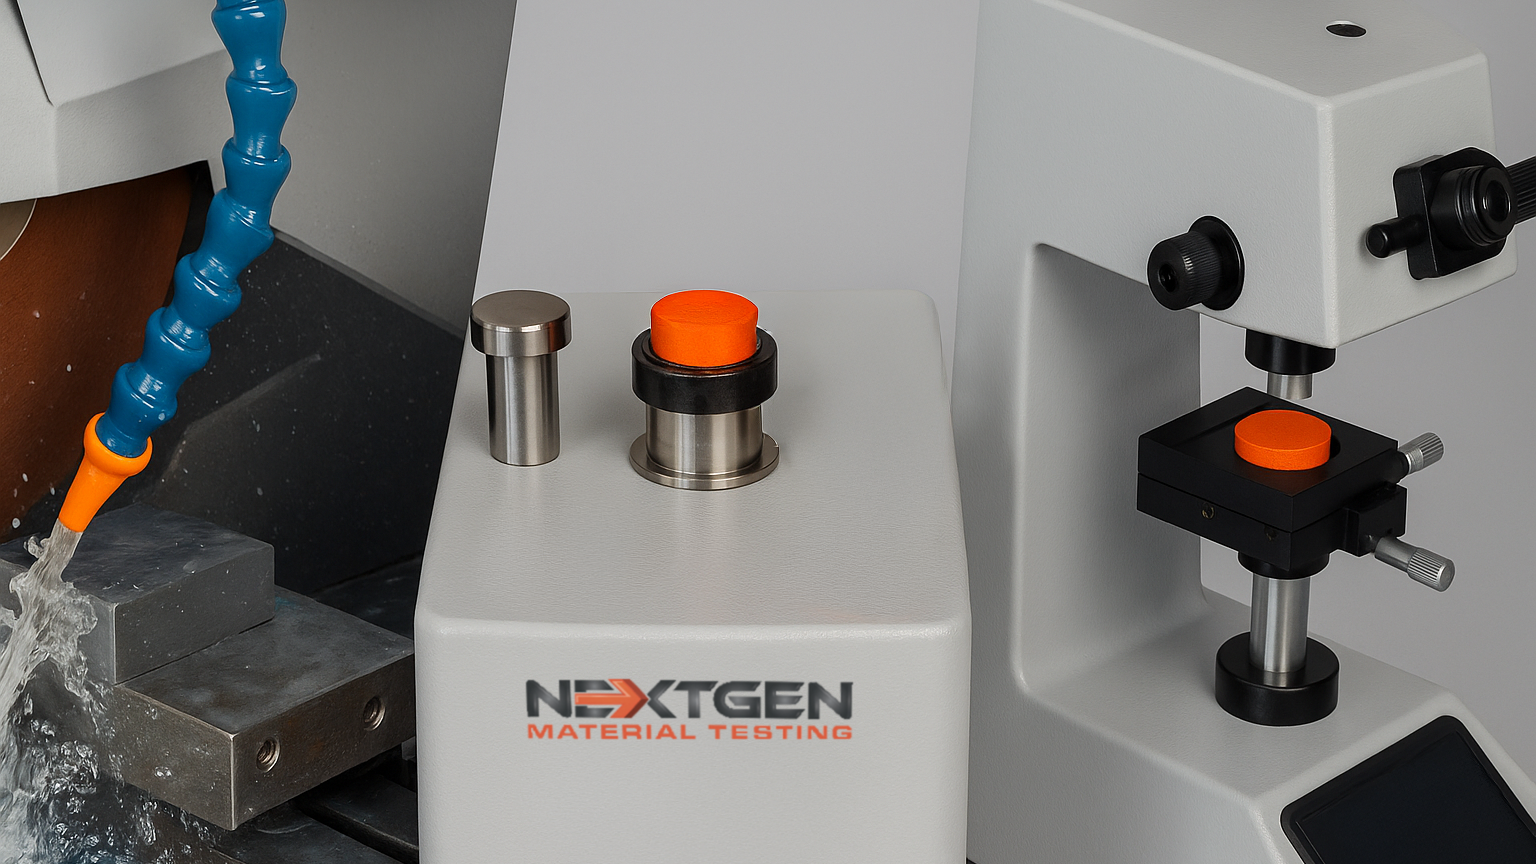
Microscopy also links seamlessly with microhardness testing. Vickers and Knoop methods use diamond indenters to measure hardness of microscopic regions, individual grains, phases, or layers on the same polished surface. Loads range from a few grams to one kilogram, and even slight surface roughness can distort results.
Maintaining Clean Transitions Between Preparation Stages
Between every step of sample preparation lies a task that often goes unnoticed: cleaning. It may seem routine, yet it defines the success of the entire process. Any particle left behind from a previous abrasive can scratch the specimen in seconds, masking the true microstructure with artificial lines.
After each grinding or polishing phase, the specimen should be rinsed thoroughly to remove all loose material. Ultrasonic cleaning is often preferred, as it shakes away fine debris from pores and edges without contact. A quick rinse with alcohol prevents corrosion on metals that react with water. Once clean, the surface must be completely dry before the next step begins. Compressed air or gentle warm air works best, while soft tissues or rough wiping are avoided.
Porous, sintered, or very soft materials demand special care. They can trap abrasive particles or moisture that later release during polishing, causing unpredictable scratches. For such specimens, mild air flow or blotting with lint-free wipes is safer than direct pressure.
Advanced Analytical Extensions
Optical microscopy provides the foundation for metallographic study, but advanced analytical methods expand what can be learned from the same sample. These techniques reveal crystallography, composition, and internal geometry that light alone cannot show.
The most common tool beyond optical analysis is Scanning Electron Microscopy (SEM). It offers magnifications far higher than a metallurgical microscope and uses electron signals instead of light. In secondary electron mode, SEM displays surface topography, showing texture and fine relief. In backscattered mode, contrast depends on atomic number, allowing clear phase differentiation. Coupled with Energy Dispersive X-ray Spectroscopy (EDS), the instrument can analyze local chemical composition, identifying inclusions, segregations, or alloying variations directly on the microstructure. Non-conductive specimens may require a thin carbon or gold coating to prevent charging during imaging.
A more specialized SEM-based method is Electron Backscatter Diffraction (EBSD). It determines grain orientations, phase distribution, and crystallographic texture. EBSD relies on perfect surface preparation: even slight deformation or contamination can destroy diffraction patterns. To achieve the required clarity, samples are often polished with colloidal silica or refined by ion milling. When performed correctly, EBSD produces detailed orientation maps that show how grains are aligned and how boundaries evolve during forming or heat treatment.
Another powerful yet non-destructive method is X-ray Micro-Computed Tomography (Micro-CT). It creates three-dimensional reconstructions of internal structures using X-ray absorption data. Micro-CT can detect pores, cracks, and inclusions within a material without cutting or polishing it. Although its spatial resolution is lower than SEM, it provides a full volumetric perspective, a view of what lies beneath the surface. In many cases, engineers use Micro-CT to locate a defect and then prepare that exact region metallographically for detailed optical or SEM analysis.
From Cut to Finish: One Workflow, Real Microstructure
Good preparation turns metal into readable data. The path is simple in shape and strict in practice. Sectioning extracts a representative piece. Mounting stabilizes it. Grinding removes the damaged layer and levels the face. Polishing clears the deformation skin and leaves a clean mirror. Cleaning between steps keeps abrasives from crossing over. Etching reveals grains and phases. Microscopy and measurements convert the surface into facts. Skip a step and the picture bends away from reality. Follow the sequence and the structure speaks clearly.
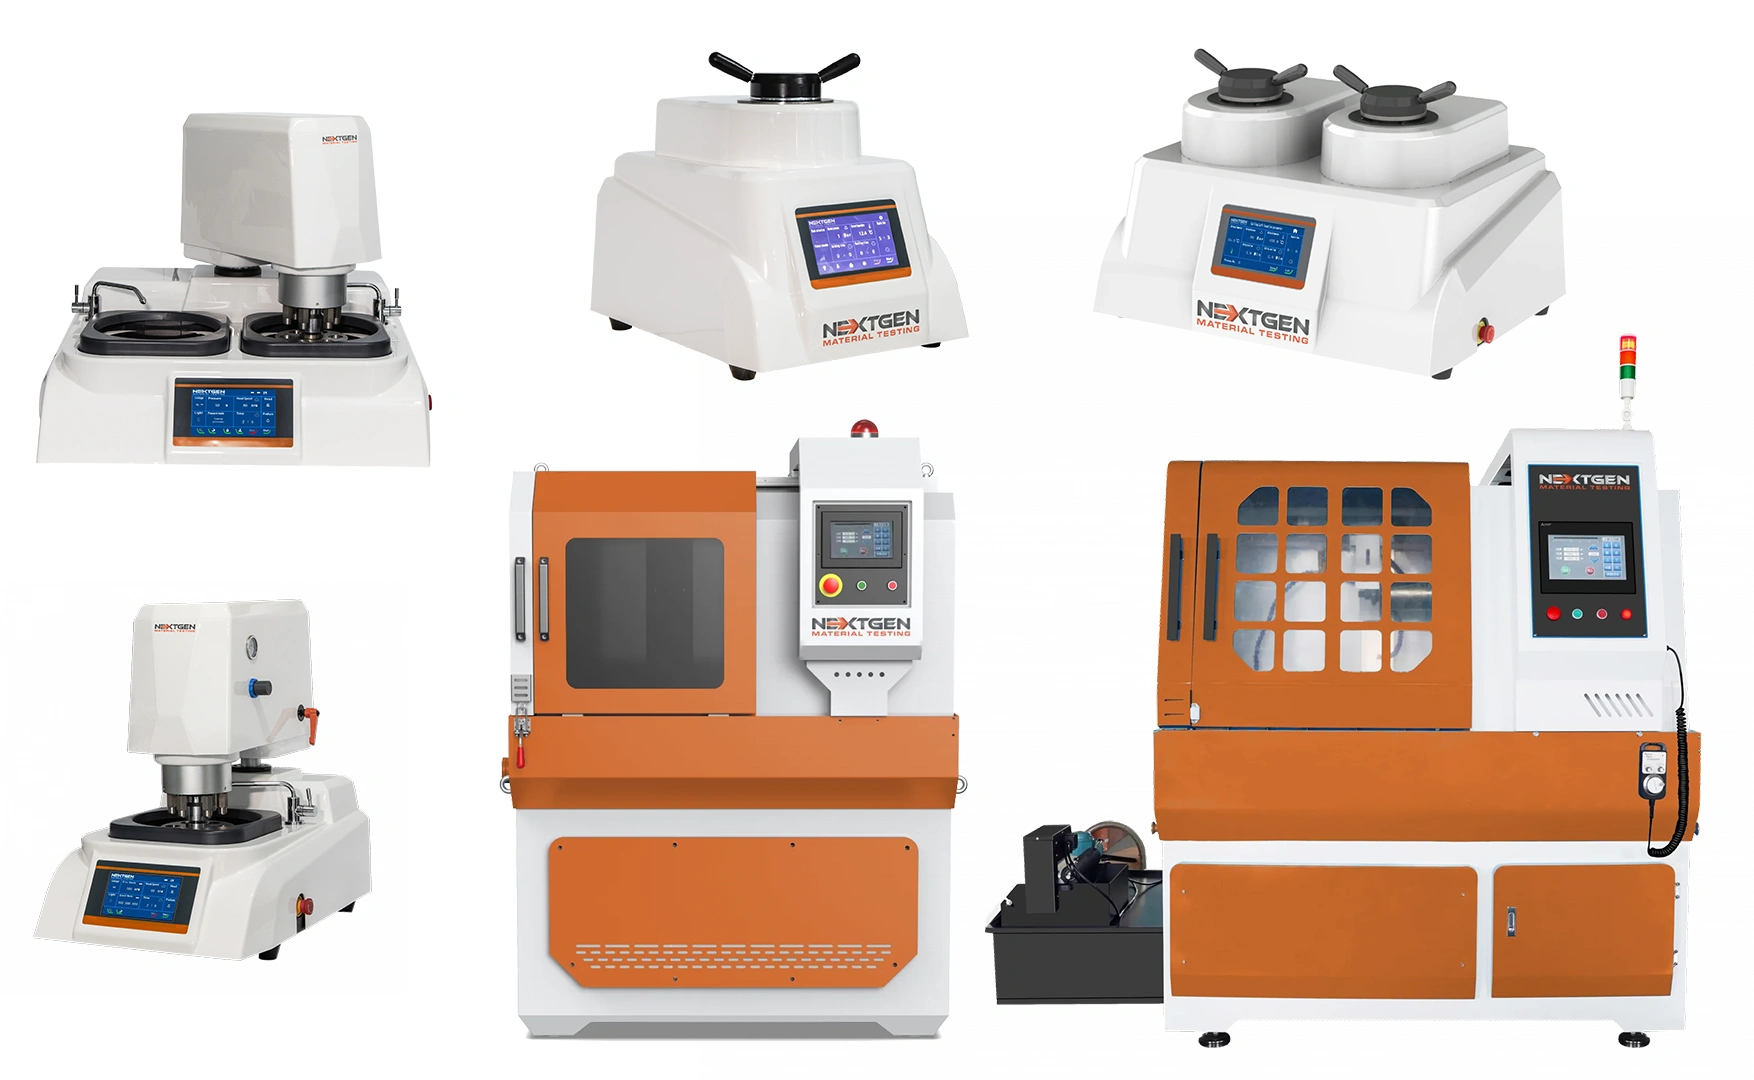
If your work involves metallographic preparation and you are looking for reliable equipment for each stage, our product line is built for that purpose. We supply the full toolkit for this workflow, covering every step from the first cut to the final polish.
Below is an overview of our main categories and selected models available for laboratories of different scales and needs:
- Abrasive Metallographic Cutting Equipment: The GenCut GL 170XY and GL 120XY models feature automated XY tables for straight or angled sectioning of flat and irregular specimens. Both offer efficient coolant flow and stable cutting performance suited for routine and advanced metallography labs.
- Precision Metallographic Cutting Equipment: This category includes precision systems such as the GenCut GL 200E and GL 100E, designed for high-accuracy cutting of small or delicate specimens where minimal heat and deformation are required.
- Mounting Press Systems and Vacuum Impregnation: The GenPress MFA Dual HYD and GenVac MP3 Series cover both hot and cold mounting needs, providing consistent puck formation, resin stability, and reliable impregnation for porous or fragile materials.
- Grinding and Polishing Equipment: The GenGrind FA-IC 250D, SA-I 250S, Belt BF, and N Series machines offer manual to fully automatic options for various sample volumes.
- Consumables and Add-ons: NextGen’s metallography consumables line includes abrasive papers, diamond suspensions, polishing pads, and resins, compatible with most global brands to maintain consistent preparation quality.
If you plan an upgrade or a new setup for metallographic sample preparation, we can help you choose. Request an online quote or contact us directly. Our team will match models to your materials, volumes, and methods, and answer every technical question.