Choosing an impact specimen cooling temperature chamber is not a question of chasing the lowest number on a specification sheet. In real lab conditions, the better chamber is the one that brings specimens to the required temperature, keeps that temperature stable, and fits the transfer routine to the impact tester without creating avoidable variation. That distinction matters because impact results are temperature-sensitive, especially when testing programs move away from ambient conditions or into the ductile-to-brittle transition range.
For most buyers, the mistake starts with oversimplification. A chamber that can reach an ultra-low setpoint still may not be the right choice if the control band is too loose, the conditioning medium is poorly matched to the workflow, or the specimen cannot be transferred quickly and consistently to the pendulum tester. In practice, selection depends on a short list of factors: actual temperature range, cooling method, stability, uniformity, specimen throughput, transfer path, and site readiness.
A specimen conditioning chamber should be treated as part of the impact testing workflow, not as a separate accessory. Its role is simple but critical: it gives the specimen the intended thermal condition before impact, then supports a repeatable handoff to the test position. Industry guidance around Charpy testing points to the same practical expectation — once the specimen leaves the conditioning environment, the time to impact must stay extremely short, commonly within five seconds. That makes chamber selection a workflow decision, not just a temperature decision.
A good buying decision starts with the test program rather than the product catalog. If the lab only needs dedicated sub-zero conditioning, one type of chamber makes sense. If the workflow also includes elevated-temperature conditioning, the answer changes. The right system is the one that matches the real operating range, the handling routine, and the level of control needed to produce repeatable impact results.
What an Impact Specimen Cooling Temperature Chamber Actually Does
An impact specimen cooling temperature chamber brings test specimens to a specified temperature before impact testing and holds them there long enough for the material to stabilize. It also supports a repeatable handoff from conditioning to the pendulum tester.
This is a conditioning step, not just cooling. The specimen has to reach the intended temperature through its section, remain stable for the test window, and be handled the same way from one sample to the next. Otherwise, the result no longer reflects the planned test condition with the same level of confidence.
Many low-temperature conditioning systems use a liquid heat-transfer medium to improve thermal contact with the specimen and speed temperature equalization. Heating systems typically rely on controlled air circulation. In both cases, the chamber is moving heat in or out of the specimen in a controlled way.
Circulation matters as well. A stagnant environment is more likely to create temperature differences inside the working area, especially when several specimens are conditioned at once. Stirring or forced circulation reduces those differences and makes batch conditioning more consistent.
Control hardware affects the workflow too. A chamber has to regulate temperature within a usable band, indicate when the setpoint has been reached, and help the operator stay inside the transfer window before impact. Sensors, controllers, and alarms are process tools, not cosmetic features.
The chamber handles heat transfer, temperature stability, batch consistency, and pre-test handling in one step. Minimum temperature is only part of the decision. Medium, circulation, control, and transfer discipline shape the result just as much.
Why Chamber Selection Matters for Test Validity, Not Just Convenience
At non-ambient test temperatures, chamber selection affects the result itself, not just the setup around it. Once a specimen leaves the conditioning environment, its temperature starts to drift. The longer that delay, the less certain the temperature at impact becomes. Practical guidance used across the industry keeps that transfer window extremely short — commonly no more than five seconds from removal to strike.
That requirement changes how a chamber should be judged. Setpoint alone is not enough. The chamber has to fit the physical routine of the lab: where it sits relative to the pendulum tester, how the specimen is removed, how quickly it can be positioned, and whether the operator can repeat that sequence the same way every time. A chamber can meet its temperature specification and still be a poor fit if it creates a slow or awkward transfer path.
Handling tools matter for the same reason. Industry guidance for temperature-conditioned impact testing points to temperature-conditioned or self-centering tongs to reduce delay and improve positioning. The goal is straightforward: limit temperature change during transfer and remove as much handling variation as possible before the strike.
Repeatability depends on more than machine calibration. It also depends on how evenly specimens are conditioned, how long they are soaked, how consistently they are transferred, and how reliably they are placed for impact. When those steps vary, measured absorbed energy can vary with them. Automation can reduce operator-related variation, but the same principle applies in manual workflows: conditioning and transfer have to follow a fixed routine.
NIST’s Charpy verification work reinforces the point. Its guidance warns that transfer times beyond five seconds can shift measured energy upward, and its broader verification materials show that test temperature can influence outcomes enough to affect whether a machine passes verification at low energy levels. For buyers, the implication is simple: chamber choice belongs inside the full chain of conditioning, transfer, and strike.
Standards and Testing Context Buyers Should Understand
For North American buyers, ASTM E23 is the main reference point for Charpy and Izod testing of metallic materials. Internationally, ISO 148-1 fills the same role for Charpy testing. In steel-related testing programs, ASTM A370 may also enter the picture. You do not need to read these documents line by line to choose a chamber, but you do need to understand what they shape: target test temperature, specimen handling, and the time allowed between conditioning and impact.
These standards matter most where the workflow becomes temperature-sensitive. Impact testing at room temperature is one thing. Testing at sub-zero or elevated temperature places more weight on conditioning quality, transfer discipline, and specimen temperature at the moment of impact. That is where chamber selection stops being a convenience purchase and becomes part of the test method.
Temperature range should also be read in context. Some labs only need moderate sub-zero conditioning. Others work deeper into cryogenic territory. ASTM E23 addresses Charpy testing at high and low temperatures. For conventional Charpy work, -196°C is generally treated as the practical lower boundary of the method it covers.
The Key Factors That Should Drive Chamber Selection
A chamber should be selected around the test program, the handling routine, and the operating conditions in the lab. Minimum temperature is only one part of the decision. Range, cooling method, stability, uniformity, throughput, transfer speed, and safety determine whether the chamber will support repeatable impact testing or create avoidable variation.
Required Temperature Range
Start with the temperatures the lab actually uses. Many Charpy programs run at common sub-zero points such as -20°C or -40°C. Some go lower. Some also require elevated-temperature conditioning. The chamber only needs to cover the working range of the test program. Anything beyond that adds complexity without improving the workflow.
Compressor vs Liquid Nitrogen
This is the main technical split. Compressor-based systems fit routine low-temperature work where the lab wants simpler installation and no cryogen supply. Liquid nitrogen systems are used when the program requires ultra-low temperatures that mechanical refrigeration cannot realistically cover. LN2 also brings extra requirements: supply, fittings, ventilation, and cryogenic handling procedures.
Temperature Control Accuracy and Stability
A chamber has to hold temperature, not just reach it. Control performance matters most near temperature-sensitive regions, where small shifts in specimen temperature can change absorbed energy enough to add visible scatter. Display resolution alone says very little. Real performance depends on how stable the chamber stays under load, at the target setpoint, with the actual batch size.
Temperature Uniformity and Circulation
A displayed setpoint does not prove that every specimen has reached the same temperature. Uniformity depends on how evenly the chamber removes or supplies heat across the working zone. Circulation reduces gradients. So does proper spacing. Overcrowding, specimen contact, and repeated access all make stabilization less consistent.
Specimen Throughput and Batch Handling
Throughput affects chamber choice as soon as the lab moves beyond occasional testing. Batch size changes circulation, soak consistency, and access speed. Higher-capacity workflows need a fixed routine: a defined loading pattern, a defined soak time, and handling that does not slow transfer to the tester. If capacity is not clearly defined, it should be treated as an open technical point.
Transfer Path to the Impact Tester
Transfer time matters once the specimen leaves the conditioning environment. Industry guidance keeps that interval short, commonly around five seconds. Chamber placement, access design, basket design, and handling tools all affect whether the operator can stay inside that window. A chamber can meet its temperature specification and still be the wrong choice if the transfer path is too slow or awkward.
Cooling-Only vs Cooling-and-Heating Capability
This depends on the scope of the testing program. A cooling-only chamber fits labs that condition below ambient and do not need heated specimens. A combined cooling-and-heating system fits labs that run both low- and high-temperature conditioning in one workflow. More capability is not automatically better. The chamber should match the actual work.
Safety, Thermal Medium, and Operating Practicality
Thermal medium changes the operating demands of the system. Flammable liquids require control of spills, ignition sources, ventilation, and disposal. LN2 systems add cryogenic hazards, oxygen-displacement risk, and ventilation planning. These are purchase criteria, not post-installation details. The right chamber is one the lab can run safely and consistently under normal operating conditions.
Common Buying Mistakes When Choosing an Impact Specimen Chamber
Most selection mistakes happen before the chamber is installed. The problem is usually not the equipment alone. It is a mismatch between the chamber, the test program, and the way the lab actually works.
Choosing by Minimum Temperature Alone
The lowest temperature is easy to compare, so buyers often treat it as the main decision point. It is not. A chamber also has to hold temperature steadily, condition specimens uniformly, and fit the transfer routine to the tester. A lower minimum setpoint does not help if the lab never uses it or cannot support the system required to reach it.
Ignoring the Transfer Window
A chamber can meet its specification and still fail the workflow. Once the specimen is removed, the transfer to impact has to happen fast. Industry guidance commonly centers that interval around five seconds. If the chamber sits too far from the pendulum tester, opens awkwardly, or slows handling, the actual specimen temperature at impact becomes less certain.
Underestimating Uniformity
Setpoint and uniformity are not the same thing. Buyers often focus on controller numbers and ignore how evenly the chamber conditions a full batch. Poor circulation, overcrowding, specimen contact, and repeated opening all make specimen-to-specimen consistency worse.
Underplanning for Safety and Facility Readiness
The thermal medium and cooling method change the installation requirements. Flammable liquids bring spill, ignition, ventilation, and disposal concerns. LN2 systems add cryogenic hazards, oxygen-displacement risk, supply hardware, and ventilation planning. These are selection criteria, not details to solve after delivery.
Buying Cooling-Only When Heating Is Also Part of the Program
Some labs buy for the immediate job and ignore the full conditioning range used across the test schedule. That works until elevated-temperature testing becomes part of the workflow. If the lab regularly runs both low- and high-temperature conditioning, a cooling-only chamber creates an avoidable gap.
Missing Ambient and Fluid Assumptions Behind the Specification
Performance can depend on ambient temperature and the fluid used in the chamber. Buyers who read only the headline range may miss the operating assumptions behind it. That can lead to a chamber that performs differently in the real lab than expected.
How NextGen Addresses Different Impact Specimen Conditioning Needs
At this stage, the decision is no longer theoretical. The selection criteria are already clear: required temperature range, cooling method, control quality, transfer discipline, and operating conditions in the lab. NextGen offers two chamber paths for different conditioning requirements.
NG-ISCC Series
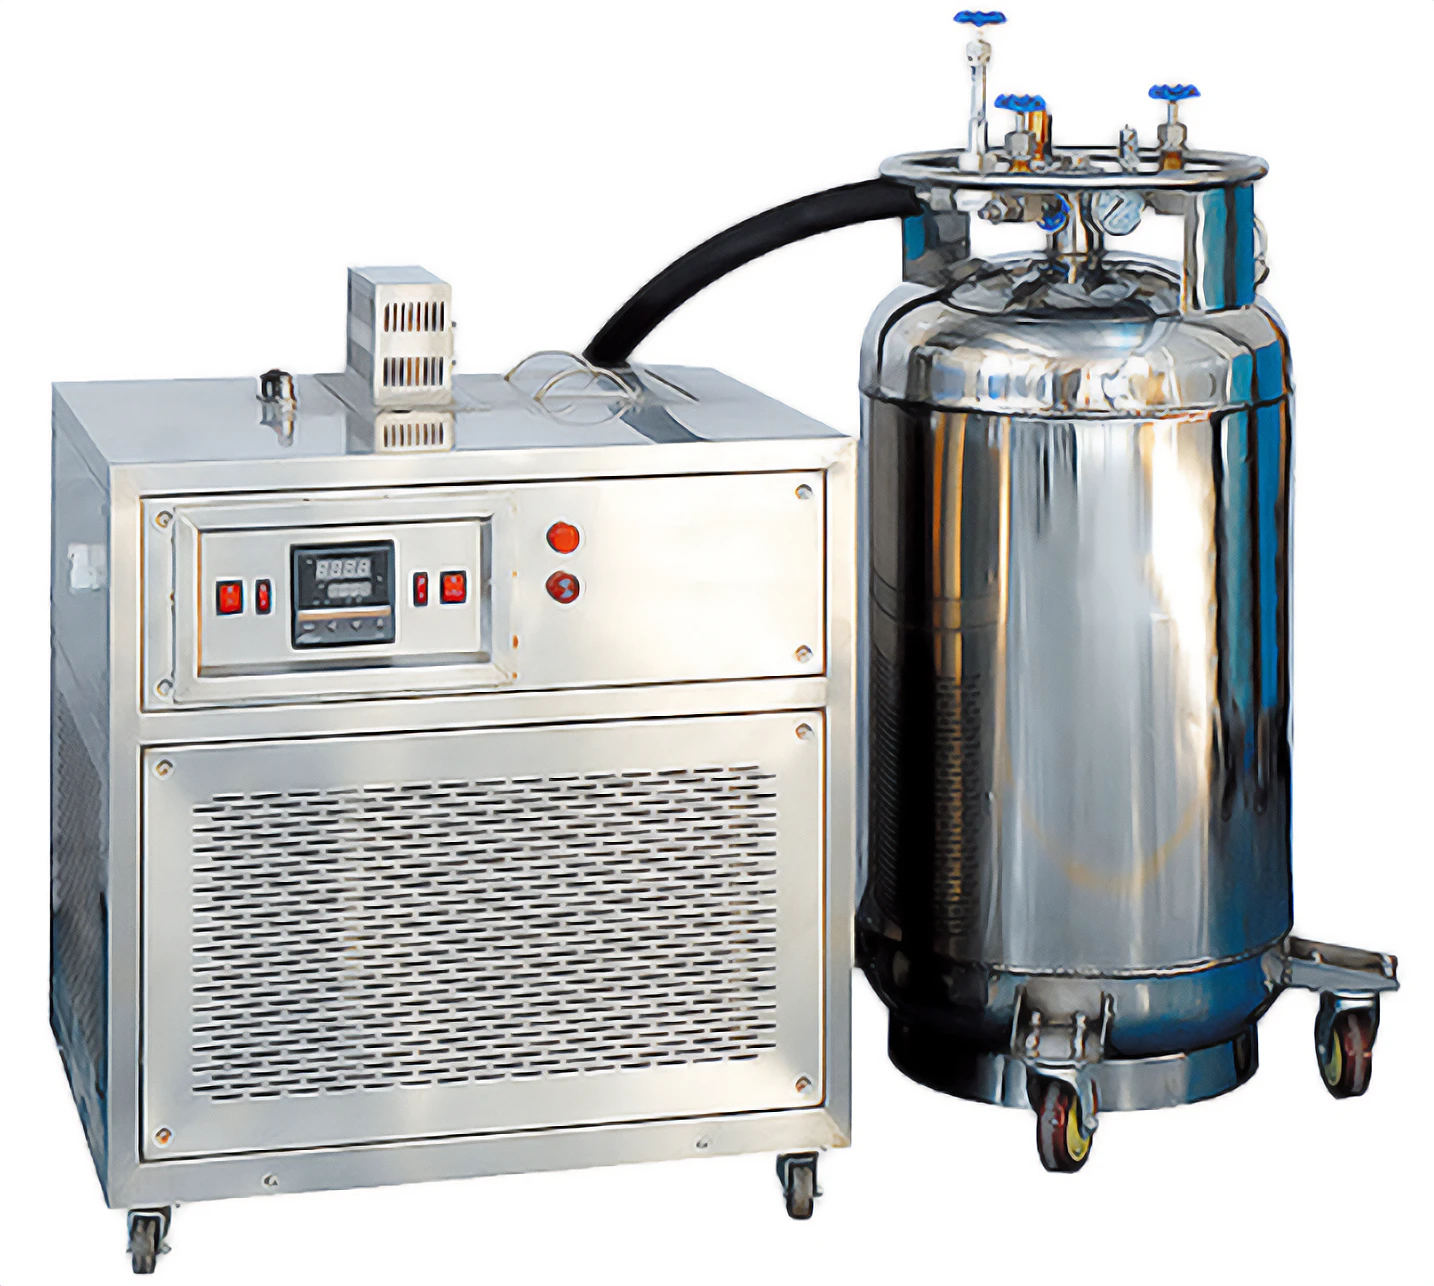
The NG-ISCC Series is designed for cooling-only specimen conditioning before pendulum impact testing. The available models cover -60°C, -80°C, -100°C, and -196°C, all with an upper limit of +30°C. That gives labs a clear choice between standard refrigeration and liquid-nitrogen-based conditioning, depending on how low the test program needs to go.
The lineup is straightforward:
- NG-ISCC-60 and NG-ISCC-80 use compressor-based cooling
- NG-ISCC-100 and NG-ISCC-196 use liquid nitrogen
- Control accuracy is ≤ ±0.5°C
- Instrument resolution is 0.01°C
- Cooling uses ethanol or another non-freezing solution
The series fits labs that need dedicated low-temperature conditioning and do not need heated specimen preparation in the same platform. It also gives buyers a practical way to choose between moderate sub-zero work and ultra-low conditioning without moving into a different product family. The right configuration should be matched to specimen size, spacing, and the batch routine used in the lab.
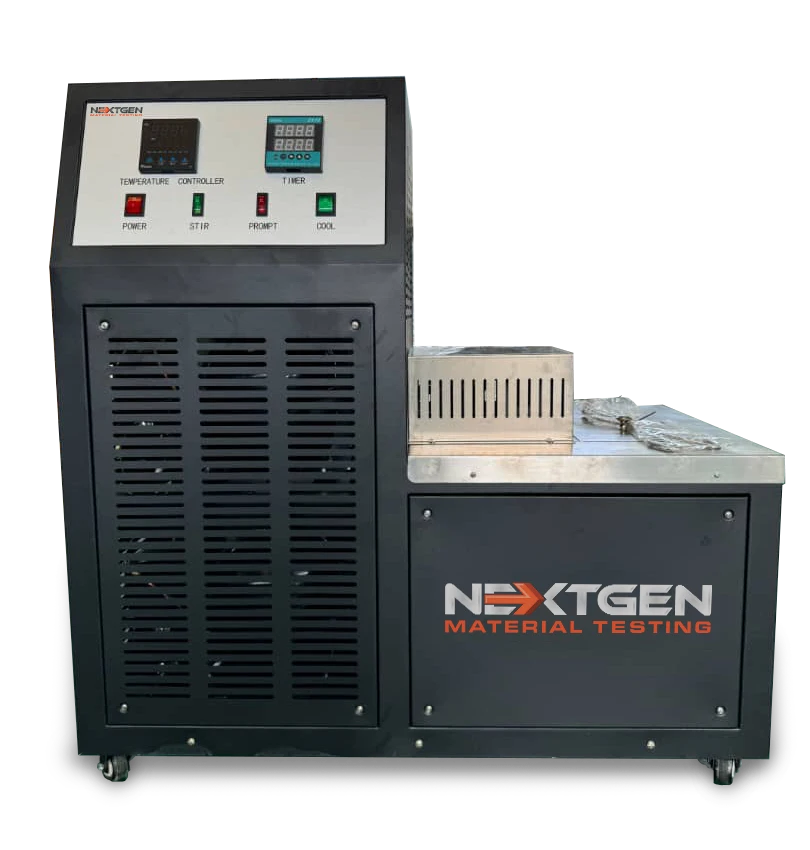
Cooling and Heating Temperature Chamber
 The Cooling and Heating Temperature Chamber covers both sides of the workflow. Its range extends down to -80°C in cooling mode and up to +100°C in heating mode under the specified ambient operating condition. It fits labs that run both sub-zero and elevated-temperature conditioning instead of cold-only work.
Core specifications include:
- Cooling accuracy ≤ ±0.5°C
- Heating stability < ±1°C
- Display resolution: 0.1°C
- Cooling medium: ethyl alcohol
- Heating medium air
- Capacity for 60 to 120 specimens at the standard 10 × 10 × 55 mm size
This chamber fits labs that need one platform for both low- and elevated-temperature conditioning. It also provides clear parameters for planning capacity and installation.
How to Decide Between the Two
Choose the NG-ISCC Series when the job is dedicated to low-temperature conditioning before impact testing and the main question is how low the chamber needs to go. Choose the Cooling and Heating Temperature Chamber when the lab needs one platform for both cold and heated specimen conditioning.
Final Selection Checklist
Before choosing a chamber, the lab should be able to answer a short list of technical questions:
- What minimum temperature does the test program actually require?
- Is cooling-only enough, or is cooling and heating both required?
- Is a compressor system sufficient, or does the workflow require LN2?
- Is temperature control stable enough at the actual working setpoint?
- How will specimen uniformity be maintained across the batch?
- Can the chamber layout support transfer to impact within the required window?
- Are the thermal medium and site safety requirements manageable?
- Can your lab maintain the ambient conditions required for the full temperature range?
Final Considerations Before You Buy
The right chamber is the one that matches the temperature range, transfer workflow, and operating conditions the lab actually works with. Some programs need dedicated low-temperature conditioning. Others need one platform that can handle both cold and elevated-temperature specimen preparation. The better choice comes from the test routine, not from the broadest specification on the page.
If you are comparing options for impact specimen conditioning, NextGen can help match the right chamber to your testing range, lab setup, and workflow requirements. Contact us to discuss your application, or request a quote for the chamber that matches your testing range and workflow.